原创
转载请注明出处,侵权必究。
一、简介
本文主要包括如何实现电信物联网平台的单个服务内加入多个属性数据传输配置。
最后进行数据解码验证。
二、配置物联网平台
2.1 profile文件的编写
鉴于之前已经讨论过如何实现可视化实现设备描述文件,这里采用程序编写profile的方式。
profile文件(zip文件)命名格式为设备类型_厂商ID_设备名称.zip(deviceType_manufacturerId_model.zip)。我的压力profile文件结构如下所示:
StressMonitorUnion_ZJU_Union001.zip
|---- profile(设备的profile文件夹)
|-----devicetype-capability.json(设备类型能力json)
|---- service(服务文件夹)
|----- Stress(压力服务文件夹)
|----- profile(压力服务profile文件夹)
|----- servicetype-capability.json(压力服务类型能力json)

代码如下:
1、devicetype-capability.json
设备的能力描述文件包括一个服务:压力服务。
{
    "devices": [
        {
            "manufacturerId": "ZJU",
            "manufacturerName": "ZJU",
            "model":  "StressMonitor001",
            "protocolType": "CoAP",
            "deviceType": "StressMonitor",
            "serviceTypeCapabilities": [
                {
                    "serviceId": "Stress",
                    "serviceType": "Stress",
                    "option": "Master"
                }
            ]
        }
    ]
}
2、servicetype-capability.json
服务类型包含三个属性:压力中值(长度6)、压力最小值(长度6)、压力最大值(长度6)。
{
    "services": [
        {
            "serviceType": "Stress",
            "description": "Stress",
            "commands": null,
            "properties": [
                {
                    "propertyName": "middleStressValue",
                    "dataType": "string",
                    "required": true,
                    "min": 0,
                    "max": 0,
                    "step": 0,
                    "maxLength": 6,
                    "method": "RW",
                    "unit": "N",
                    "enumList": null
                },
                {
                    "propertyName": "lowestStressValue",
                    "dataType": "string",
                    "required": true,
                    "min": 0,
                    "max": 0,
                    "step": 0,
                    "maxLength": 6,
                    "method": "RW",
                    "unit": "N",
                    "enumList": null
                },
                {
                    "propertyName": "highestStressValue",
                    "dataType": "string",
                    "required": true,
                    "min": 0,
                    "max": 0,
                    "step": 0,
                    "maxLength": 6,
                    "method": "RW",
                    "unit": "N",
                    "enumList": null
                }
            ]
        }
    ]
}
2.2 profile文件上传
在profile在线编辑的那一栏,有Profile导入,将上述zip文件导入即可。
2.3 插件开发
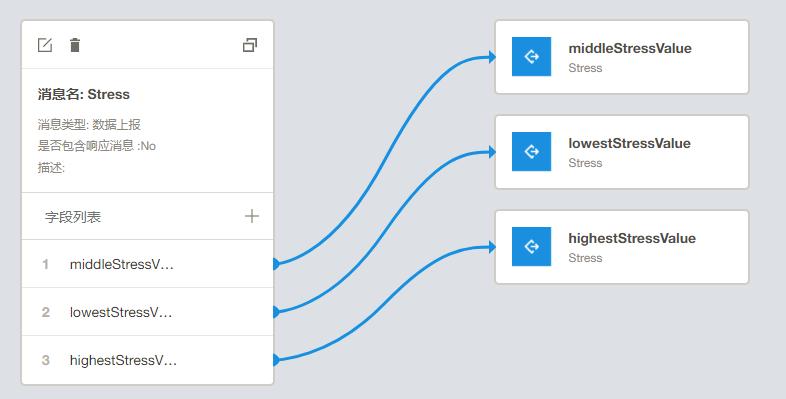
参考之前的插件开发方法。将压力服务的三个属性都拖入到编解码。

而后部署即可。
2.4 设备注册
用上述Profile进行设备的注册,参考其他文章。我们这里随便给一个验证码(13859017),如果是真实的设备要填写IMEI。
三、数据解码验证
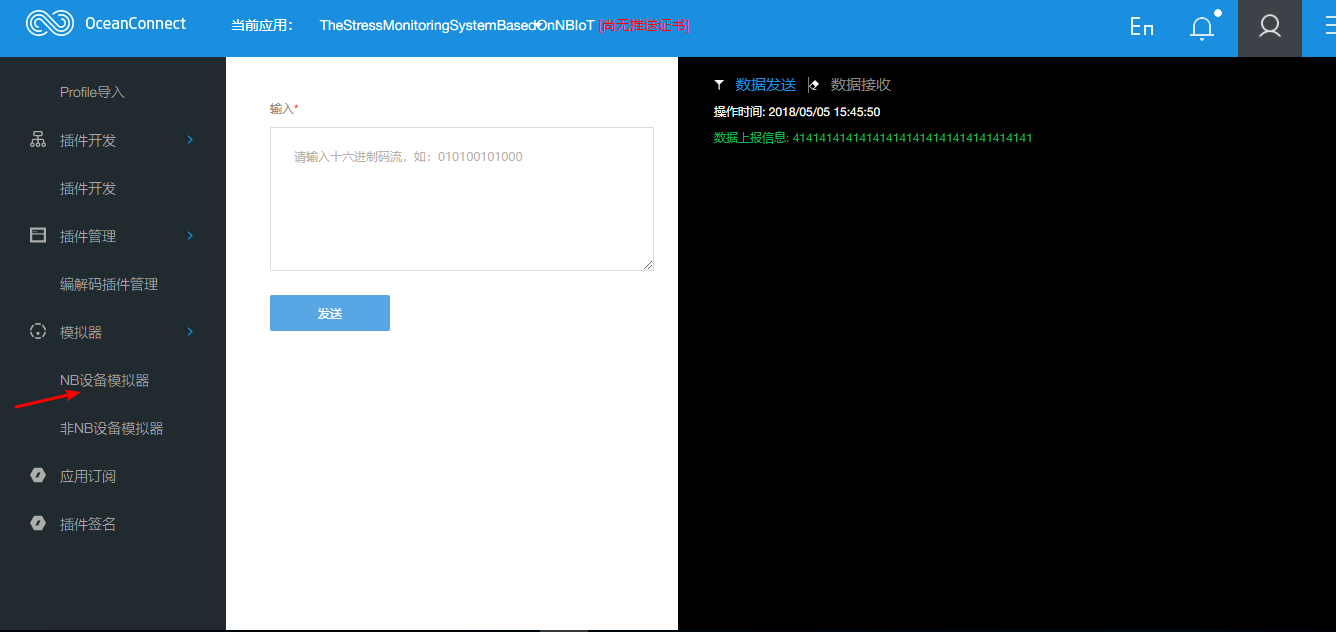
在NB模拟器这里进行数据发送的模拟。

我们输入十六进制数据,比如我们要发送压力中值(AAAAAA)、压力最小值(AAAAAA)、压力最大值(AAAAAA)。A对应十进制65,十六进制41,则我们这里发送18个字符41。
为什么是41?
因为设备以十六进制码流发送数据,用2个十六进制数来表示0~255,即ASCII码。因为A是第65个字符,十六进制对应41,所要发送41。
而后我们可以在设备的历史文件中查看数据。

可以发现,数据虽然以一连串的方式发送,但是被分解成了三个:middleStressValue、lowestStressValue和highestStressValue。
说明本次实验成功。
欢迎关注我的微信公众号
互联网矿工
