1、介绍
MyBatis是一个简单,小巧但功能非常强大的ORM(Object-Relational Mapping,对象-关系映射)开源框架,它的功能强大也体现在它的缓存机制上。MyBatis提供了一级缓存、二级缓存这两个缓存机制,能够很好地处理和维护缓存,以提高系统的性能。
1.1 一级缓存
对于会话(Session)级别的数据缓存,我们称之为一级数据缓存,简称一级缓存。
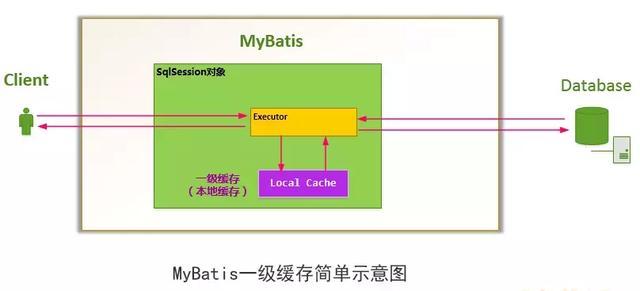
每当我们使用MyBatis开启一次和数据库的会话,MyBatis会创建出一个SqlSession对象表示一次数据库会话。
在对数据库的一次会话中,我们有可能会反复地执行完全相同的查询语句,如果不采取一些措施的话,每一次查询都会查询一次数据库,而我们在极短的时间内做了完全相同的查询,那么它们的结果极有可能完全相同,由于查询一次数据库的代价很大,这有可能造成很大的资源浪费。
为了解决这一问题,减少资源的浪费,MyBatis会在表示会话的SqlSession对象中建立一个简单的缓存,将每次查询到的结果结果缓存起来,当下次查询的时候,如果判断先前有个完全一样的查询,会直接从缓存中直接将结果取出,返回给用户,不需要再进行一次数据库查询了。
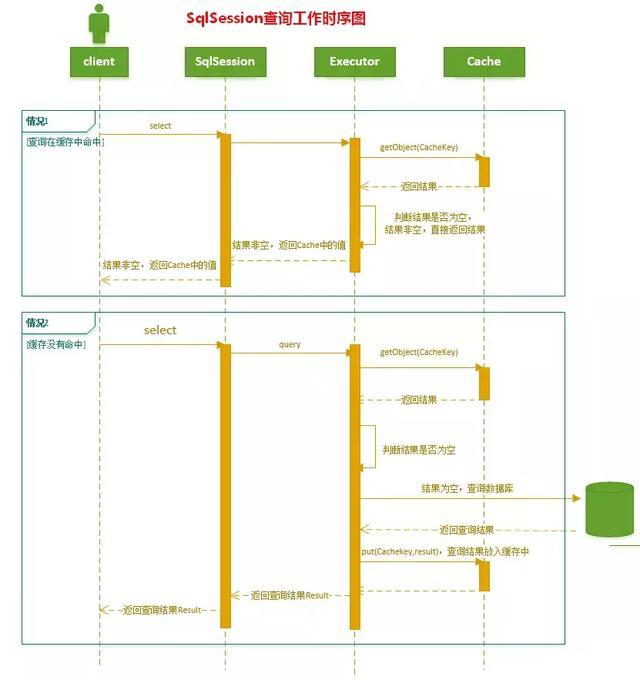
MyBatis会在一次会话的表示(一个SqlSession对象)中创建一个本地缓存(local cache),对于每一次查询,都会尝试根据查询的条件去本地缓存中查找是否在缓存中,如果在缓存中,就直接从缓存中取出,然后返回给用户;否则,从数据库读取数据,将查询结果存入缓存并返回给用户。

1.2 一级缓存实现原理
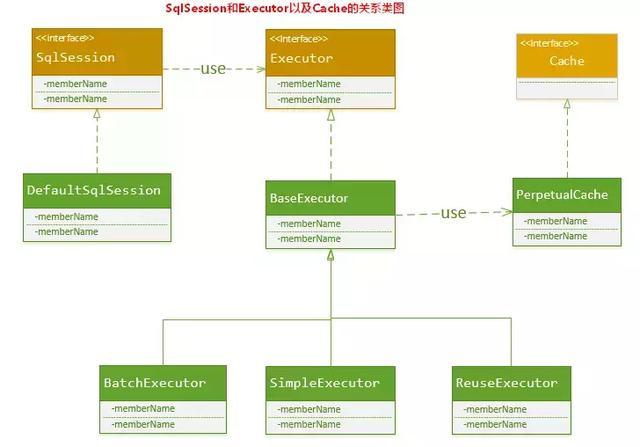
MyBatis只是一个MyBatis对外的接口,SqlSession将它的工作交给了Executor执行器这个角色来完成,负责完成对数据库的各种操作。当创建了一个SqlSession对象时,MyBatis会为这个SqlSession对象创建一个新的Executor执行器,而缓存信息就被维护在这个Executor执行器中,MyBatis将缓存和对缓存相关的操作封装成了Cache接口中。SqlSession、Executor、Cache之间的关系如下列类图所示:

Executor接口的实现类BaseExecutor中拥有一个Cache接口的实现类PerpetualCache,则对于BaseExecutor对象而言,它将使用PerpetualCache对象维护缓存。
由于Session级别的一级缓存实际上就是使用PerpetualCache维护的,那么PerpetualCache是怎样实现的呢?
PerpetualCache实现原理其实很简单,其内部就是通过一个简单的HashMap<k,v> 来实现的,没有其他的任何限制。如下是PerpetualCache的实现代码:
public class PerpetualCache implements Cache {
	private String id;
	private Map<Object, Object> cache = new HashMap<Object, Object>();
	public PerpetualCache(String id) {
 		this.id = id;
 	}
	public String getId() {
 		return id;
 	}
 	public int getSize() {
 		return cache.size();
 	}
 	public void putObject(Object key, Object value) {
 		cache.put(key, value);
 	}
 	public Object getObject(Object key) {
 		return cache.get(key);
 	}
 	public Object removeObject(Object key) {
 		return cache.remove(key);
 	}
 	public void clear() {
 		cache.clear();
 	}
 	public ReadWriteLock getReadWriteLock() {
 		return null;
 	}
 	public boolean equals(Object o) {
 		if (getId() == null) throw new CacheException("Cache instances require an ID.");
 		if (this == o) return true;
 		if (!(o instanceof Cache)) return false;

 		Cache otherCache = (Cache) o;
 		return getId().equals(otherCache.getId());
	}
 	public int hashCode() {
 		if (getId() == null) throw new CacheException("Cache instances require an ID.");
 		return getId().hashCode();
 	}

}
1.3 一级缓存的生命周期
a. MyBatis在开启一个数据库会话时,会创建一个新的SqlSession对象,SqlSession对象中会有一个新的Executor对象,Executor对象中持有一个新的PerpetualCache对象;当会话结束时,SqlSession对象及其内部的Executor对象还有PerpetualCache对象也一并释放掉。
b. 如果SqlSession调用了close()方法,会释放掉一级缓存PerpetualCache对象,一级缓存将不可用;
c. 如果SqlSession调用了clearCache(),会清空PerpetualCache对象中的数据,但是该对象仍可使用;
d.SqlSession中执行了任何一个update操作(update()、delete()、insert()) ,都会清空PerpetualCache对象的数据,但是该对象可以继续使用;

1.4 相同查询认定
对于两次查询,如果以下条件都完全一样,那么就认为它们是完全相同的两次查询:
- 传入的 statementId
- 查询时要求的结果集中的结果范围 (结果的范围通过rowBounds.offset和rowBounds.limit表示);
- 这次查询所产生的最终要传递给JDBC java.sql.Preparedstatement的Sql语句字符串(boundSql.getSql() )
- 传递给java.sql.Statement要设置的参数值
2、MyBatis使用
MyBatis是被Spring整合使用的,但是他也可以独立使用。
使用流程
- 建立PO类。用于对数据库中数据的映射,使程序员更关注对Java类的使用而不是数据库的操作。
- 建立Mapper。数据库操作的映射文件,也就是我们常常说的DAO(Data Access Objects,数据库访问对象),用于映射数据库的操作,可以通过配置文件指定方法对应的SQL语句或者直接使用Java提供注解方式进行SQL的指定。
- 建立配置文件。配置文件主要用于配置程序中可变性高的设置,MyBatis中的配置文件主要封装在configuration中。
- 建立映射文件。对应于MyBatis全局配置中的mappers的配置属性。主要用于建立对应数据库操作接口的SQL映射。MyBatis会将这里设定的SQL与对应的Java接口相关联,以保证在MyBatis中调用接口的时候会到数据库中执行相应的SQL来简化开发。
DAO的组成
1.DatabaseConnection数据库连接类: 专门负责数据库打开与关闭的类,即连接数据库并获取连接对象。
2.VO实体类:主要由属性、setter、getter方法组成,VO类中的属性与表中的字段相对应,每一个VO类的对象都表示表中的每一条记录,即包含属性和表中字段完全对应的类。
3.DAO接口:主要定义操作的接口,定义一系列数据库的原子性操作,例如:增加、修改、删除、按ID查询等,即提供了用户所有的操作方法(就如老师给学生提供一些学习方法)。
4.Impl(DAO实现类): DAO接口的真实实现类,完成具体的数据库操作,但是不负责数据库的打开和关闭,即实现DAO中所有的方法(就如老师给提供的方法看你如何去完成);
5.Proxy :代理实现类,主要完成数据库的打开和关闭,并且调用真实实现类对象的操作
6.Factory(DAO工厂类):通过工厂类取得一个DAO的实例化对象,为程序提供方法,如果要替换DAO实现类,只需要修改该Dao工厂类中的方法代码,而不必邀修改所有的操作数据库代码(如代理人专门为需要的公司提供人才,也叫做服务层)。
2.1 MyBatis实例
1.建立PO类
用于对数据库中数据的映射,使程序员更关注对Java类的使用而不是数据库的操作。
package com.wangjun.mybatis.test.mybatis;

public class User {
    private Integer id;
    private String name;
    private Integer age;
    public User(String name, Integer age) {
        super();
        this.name = name;
        this.age = age;
    }
    //必须要有这个无参构造器,不然根据UserMapper.xml中的配置,在查询数据库的时候,将不能呢过反射构造出User实例
    public User() {
    }

    public Integer getId() {
        return id;
    }

    public void setId(Integer id) {
        this.id = id;
    }

    public String getName() {
        return name;
    }

    public void setName(String name) {
        this.name = name;
    }

    public Integer getAge() {
        return age;
    }

    public void setAge(Integer age) {
        this.age = age;
    }
}
2.建立mapper
数据库操作的映射文件,也就是我们常常说的DAO(Data Access Objects,数据库访问对象),用于映射数据库的操作,可以通过配置文件指定方法对应的SQL语句或者直接使用Java提供注解方式进行SQL的指定。
package com.wangjun.mybatis.test.mybatis;

public interface UserMapper {
    public void insertUser(User user);
    public User getUser(Integer id);
}
3.建立配置文件configuration.xml
配置文件主要用于配置程序中可变性高的设置,MyBatis中的配置文件主要封装在configuration(名称无所谓,在调用的时候会指定)中。
<?xml version="1.0" encoding="UTF-8" ?>
<!DOCTYPE configuration
  PUBLIC "-//mybatis.org//DTD Config 3.0//EN"
  "http://mybatis.org/dtd/mybatis-3-config.dtd">
<configuration>
    <settings>
        <setting name="cacheEnabled" value="false"></setting>
        <setting name="useGeneratedKeys" value="true"></setting>
        <setting name="defaultExecutorType" value="REUSE"></setting>
    </settings>
    <typeAliases>
        <typeAlias alias="User" type="com.wangjun.mybatis.test.mybatis.User"/>
    </typeAliases>
  <environments default="development">
    <environment id="development">
      <transactionManager type="JDBC"/>
      <dataSource type="POOLED">
        <!-- 新版本的jdbc建议使用com.mysql.cj.jdbc.Driver -->
        <property name="driver" value="com.mysql.cj.jdbc.Driver"/>
        <!-- 不加 ?serverTimezone=GMT 可能会有数据库时区和系统时区不一致导致的问题 -->
        <property name="url" value="jdbc:mysql://localhost/test?serverTimezone=GMT"/>
        <property name="username" value="root"/>
        <property name="password" value="password"/>
      </dataSource>
    </environment>
  </environments>
  <mappers>
    <mapper resource="UserMapper.xml"/>
  </mappers>
</configuration>
4.建立映射文件UserMapper.xml
对应于MyBatis全局配置中的mappers的配置属性。主要用于建立对应数据库操作接口的SQL映射。MyBatis会将这里设定的SQL与对应的Java接口相关联,以保证在MyBatis中调用接口的时候会到数据库中执行相应的SQL来简化开发。
<?xml version="1.0" encoding="UTF-8" ?>
<!DOCTYPE mapper
  PUBLIC "-//mybatis.org//DTD Mapper 3.0//EN"
  "http://mybatis.org/dtd/mybatis-3-mapper.dtd">
<mapper namespace="com.wangjun.mybatis.test.mybatis.UserMapper">
    <insert id="insertUser" parameterType="User">
        insert into user(name,age) values(#{name},#{age})
    </insert>
    <select id="getUser" resultType="User" parameterType="java.lang.Integer">
      select * from user where id = #{id}
    </select>
</mapper>
5.测试类
package com.wangjun.mybatis.test.mybatis;

import java.io.IOException;
import java.io.Reader;

import org.apache.ibatis.io.Resources;
import org.apache.ibatis.session.SqlSessionFactory;
import org.apache.ibatis.session.SqlSessionFactoryBuilder;

public class MyBatisUtil
{
    private final static SqlSessionFactory sqlSessionFactory;
    static {
        //配置文件地址
        String resource = "configuration.xml";
        Reader reader = null;
        try {
            //从配置文件读取
            reader = Resources.getResourceAsReader(resource);
        } catch (IOException e) {
            e.printStackTrace();
        }
        sqlSessionFactory = new SqlSessionFactoryBuilder().build(reader);
    }
    public static SqlSessionFactory getSqlSessionFactory() {
        return sqlSessionFactory;
    }
}
package com.wangjun.mybatis.test.mybatis;

import org.apache.ibatis.session.SqlSession;
import org.apache.ibatis.session.SqlSessionFactory;

public class TestMapper {
    static SqlSessionFactory sqlSessionFactory = null;
    static {
        System.out.println(111);
        sqlSessionFactory = MyBatisUtil.getSqlSessionFactory();
    }

    public void testAdd() {
        SqlSession sqlSession = sqlSessionFactory.openSession();
        try {
            UserMapper userMapper = sqlSession.getMapper(UserMapper.class);
            User user = new User("wangjun", new Integer(25));
            userMapper.insertUser(user);
            sqlSession.commit();
        }finally {
            sqlSession.close();
        }
    }
    public void getUser() {
        SqlSession sqlSession = sqlSessionFactory.openSession();
        try {
            UserMapper userMapper = sqlSession.getMapper(UserMapper.class);
            User user = userMapper.getUser(1);
            System.out.println("name:" + user.getName() + "|age:" + user.getAge());
        }finally {
            sqlSession.close();
        }
    }

    public static void main(String[] args) {
        TestMapper tm = new TestMapper();
        tm.testAdd();
        tm.getUser();
    }
}
运行结果:
name:wangjun|age:25
POM文件依赖:
<project xmlns="http://maven.apache.org/POM/4.0.0"
    xmlns:xsi="http://www.w3.org/2001/XMLSchema-instance"
    xsi:schemaLocation="http://maven.apache.org/POM/4.0.0 http://maven.apache.org/xsd/maven-4.0.0.xsd">
    <modelVersion>4.0.0</modelVersion>

    <groupId>com.wangjun.mybatis</groupId>
    <artifactId>test.mybatis</artifactId>
    <version>0.0.1-SNAPSHOT</version>
    <packaging>jar</packaging>

    <name>test.mybatis</name>
    <url>http://maven.apache.org</url>

    <properties>
        <project.build.sourceEncoding>UTF-8</project.build.sourceEncoding>
    </properties>

    <dependencies>
        <dependency>
            <groupId>junit</groupId>
            <artifactId>junit</artifactId>
            <version>3.8.1</version>
            <scope>test</scope>
        </dependency>

        <!-- https://mvnrepository.com/artifact/mysql/mysql-connector-java -->
        <dependency>
            <groupId>mysql</groupId>
            <artifactId>mysql-connector-java</artifactId>
            <version>6.0.6</version>
        </dependency>

        <dependency>
            <groupId>org.mybatis</groupId>
            <artifactId>mybatis</artifactId>
            <version>3.4.5</version>
        </dependency>
    </dependencies>
</project>
2.2 Spring整合MyBatis实例
上述步骤的1,2,4步不变。只需要配置Spring文件
1.将MyBatis配置文件的environments配置移动到了Spring的配置文件中。针对MyBstis,注册org.mybatis.Spring.SqlsessionFactoryBean类型的bean,以及用于映射接口的org.mybatis.Spring.mapper.MapperFactoryBean。
<?xml version="1.0" encoding="UTF-8"?>
<beans xmlns="http://www.springframework.org/schema/beans"
    xmlns:xsi="http://www.w3.org/2001/XMLSchema-instance"
    xsi:schemaLocation="http://www.springframework.org/schema/beans http://www.springframework.org/schema/beans/spring-beans.xsd">

    <!-- 需要maven依赖commons-dbcp包 -->
    <bean id="dataSource" class="org.apache.commons.dbcp.BasicDataSource">
        <property name="driverClassName" value="com.mysql.cj.jdbc.Driver"></property>
        <property name="url" value="jdbc:mysql://localhost/test?useSSL=false"></property>
        <property name="username" value="root"></property>
        <property name="password" value="password"></property>
        <property name="maxIdle" value="30"></property>
        <property name="defaultAutoCommit" value="true"></property>
    </bean>

    <!-- 需要maven依赖mybatis-spring和spring-jdbc包 -->
    <bean id="sqlSessionFactory" class="org.mybatis.spring.SqlSessionFactoryBean">
        <property name="configLocation" value="mybatis/configuration.xml"></property>
        <property name="dataSource" ref="dataSource"></property>
    </bean>

    <bean id="userMapper" class="org.mybatis.spring.mapper.MapperFactoryBean">
        <property name="mapperInterface" value="com.wangjun.mybatis.test.mybatis.UserMapper"></property>
        <property name="sqlSessionFactory" ref="sqlSessionFactory"></property>
    </bean>
</beans>
2.MyBatis的配置文件简化。
<?xml version="1.0" encoding="UTF-8" ?>
<!DOCTYPE configuration
  PUBLIC "-//mybatis.org//DTD Config 3.0//EN"
  "http://mybatis.org/dtd/mybatis-3-config.dtd">
<configuration>
    <typeAliases>
        <typeAlias alias="User" type="com.wangjun.mybatis.test.mybatis.User"/>
    </typeAliases>
  <mappers>
    <mapper resource="mybatis/UserMapper.xml"/>
  </mappers>
</configuration>
测试
package com.wangjun.mybatis.test.mybatis;

import org.springframework.context.ApplicationContext;
import org.springframework.context.support.ClassPathXmlApplicationContext;

public class SpringMyBatisTest {
    public static void main(String[] args) {
        ApplicationContext context = new ClassPathXmlApplicationContext("mybatis/springMyBatis.xml");
        UserMapper um = context.getBean("userMapper", UserMapper.class);
        //查询数据
        User user = um.getUser(1);
        System.out.println(user.getName());
        System.out.println(user.getAge());

        //插入数据
        User addUser = new User("lujiashaoye", 24);
        um.insertUser(addUser);
    }
}
2.3 注解
2.3.1 @Mapper
@Mapper可以将一个接口(interface)生成相应的实现类。
补充:Spring的@MapperScan也可以实现接口实现类,可以操作整个包内的接口。
欢迎关注我的微信公众号
互联网矿工
