1、Spring概述
1.1 好处
- Spring 可以使开发人员使用 POJOs 开发企业级的应用程序。只使用 POJOs 的好处是你不需要一个 EJB 容器产品,比如一个应用程序服务器,但是你可以选择使用一个健壮的 servlet 容器,比如 Tomcat 或者一些商业产品。
POJOs:Plain Ordinary Java Objects简单洁净Java对象
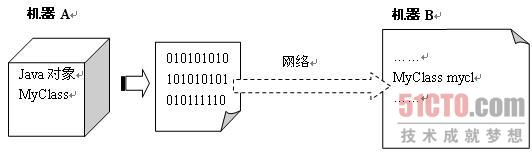
EJB:把你编写的软件中那些需要执行制定的任务的类,不放到客户端软件上了,而是给他打成包放到一个服务器上了。EJB 是运行在独立服务器上的组件,客户端是通过网络对EJB 对象进行调用的。在Java中,能够实现远程对象调用的技术是RMI,而EJB 技术基础正是RMI。通过RMI 技术,J2EE将EJB 组件创建为远程对象,客户端就可以通过网络调用EJB 对象了。
RMI:Remote Method Invocation远程方法调用,是对象的序列化和RPC(远程过程调用,本地计算机调用远程计算机上的一个函数)的结合,利用对象序列化来实现远程调用(分布计算)。
-
Spring 在一个单元模式中是有组织的。即使包和类的数量非常大,你只要担心你需要的,而其它的就可以忽略了
-
Spring 对JavaEE开发中非常难用的一些API(JDBC、JavaMail、远程调用等),都提供了封装,使这些API应用难度大大降低。
JDBC:Java Database Connectivity,用于Java编程语言和数据库之间的数据库无关连接的标准Java API
- Spring提供了一致的事务管理接口,可向下扩展到(使用一个单一的数据库,例如)本地事务并扩展到全局事务
关于为什么要使用Bean:某个bean,第一次是被new出来的,然后被分配一块内存,存放这个bean的所有信息,之后在使用到该bean的地方使用注解自动注入,这时使用的就是刚才被new出来的那个,不会再new,除非你设置@Scope(‘prototype’),依次类推,所有注入该bean的地方,最多因为对象名不同,被分配一小块内存,但这小块内存只存放指向被new出来的bean的信息,都是引用。如果每次都是new出来,每次都要分配内存,虽然说Java有自动回收机制,但如果一个项目中bean很多,在启动服务器的时候,全部加载在Spring容器,不是项目启动失败就是跑起来很慢很慢,所以说能剩则剩
1.2 依赖注入(DI)
当编写一个复杂的 Java 应用程序时,应用程序类应该尽可能的独立于其他的 Java 类来增加这些类可重用可能性,当进行单元测试时,可以使它们独立于其他类进行测试。依赖注入(或者有时被称为配线)有助于将这些类粘合在一起,并且在同一时间让它们保持独立。
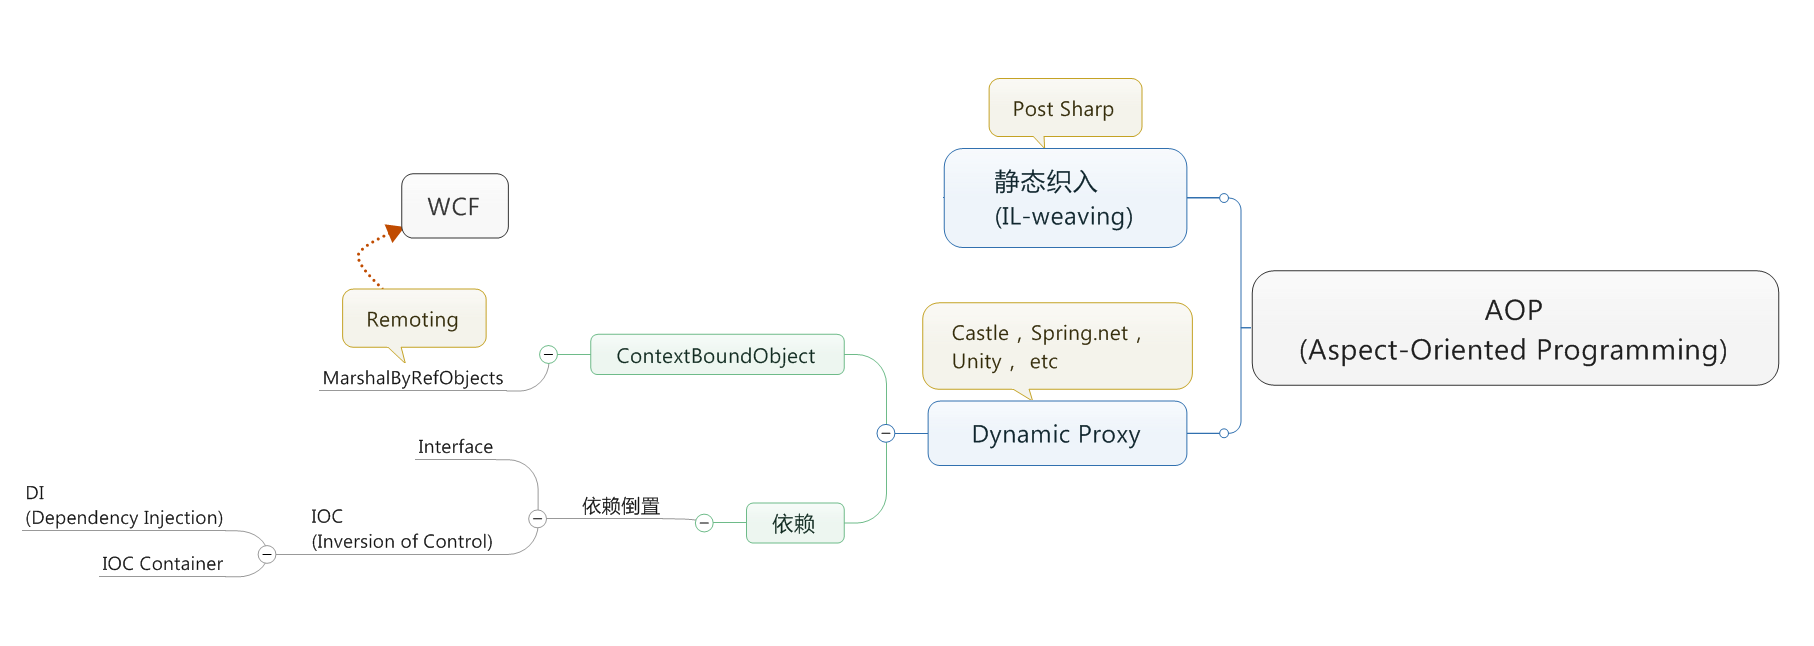
控制反转(IoC)是一个通用的概念,它可以用许多不同的方式去表达,依赖注入仅仅是控制反转的一个具体的例子。
1.3 面向方面的程序设计(AOP)
一个程序中跨越多个点的功能被称为横切关注点,这些横切关注点在概念上独立于应用程序的业务逻辑。有各种各样常见的很好的关于方面的例子,比如日志记录、声明性事务、安全性,和缓存等等。
1.4 IOC和AOP
IOC:控制反转,是一种设计模式。一层含义是控制权的转移:由传统的在程序中控制依赖转移到由容器来控制;第二层是依赖注入:将相互依赖的对象分离,在spring配置文件中描述他们的依赖关系。他们的依赖关系只在使用的时候才建立。简单来说就是不需要NEW一个对象了。
AOP:面向切面,是一种编程思想,OOP的延续。将系统中非核心的业务提取出来,进行单独处理。比如事务、日志和安全等。这个简单来说就是可以在一段程序之前或者之后做一些事。
Spring 的AOP和IOC都是为了解决系统代码耦合度过高的问题。使代码重用度高、易于维护。
不过AOP和IOC并不是spring中特有的,只是spring把他们应用的更灵活方便
2、体系结构
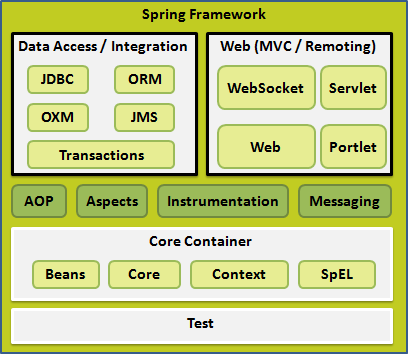
2.1 核心容器
spring-core模块提供了框架的基本组成部分,包括 IoC 和依赖注入功能。
spring-beans 模块提供 BeanFactory,工厂模式的微妙实现,它移除了编码式单例的需要,并且可以把配置和依赖从实际编码逻辑中解耦。
context模块建立在由core和 beans 模块的基础上建立起来的,它以一种类似于JNDI注册的方式访问对象。Context模块继承自Bean模块,并且添加了国际化(比如,使用资源束)、事件传播、资源加载和透明地创建上下文(比如,通过Servelet容器)等功能。Context模块也支持Java EE的功能,比如EJB、JMX和远程调用等。ApplicationContext接口是Context模块的焦点。spring-context-support提供了对第三方库集成到Spring上下文的支持,比如缓存(EhCache, Guava, JCache)、邮件(JavaMail)、调度(CommonJ, Quartz)、模板引擎(FreeMarker, JasperReports, Velocity)等。
spring-expression模块提供了强大的表达式语言,用于在运行时查询和操作对象图。它是JSP2.1规范中定义的统一表达式语言的扩展,支持set和get属性值、属性赋值、方法调用、访问数组集合及索引的内容、逻辑算术运算、命名变量、通过名字从Spring IoC容器检索对象,还支持列表的投影、选择以及聚合等。。
2.2 数据访问/集成
JDBC=Java Data Base Connectivity,ORM=Object Relational Mapping对象关系映射,OXM=Object XML Mapping,JMS=Java Message Service
JDBC 模块提供了JDBC抽象层,它消除了冗长的JDBC编码和对数据库供应商特定错误代码的解析。
ORM 模块提供了对流行的对象关系映射API的集成,包括JPA、JDO和Hibernate等。通过此模块可以让这些ORM框架和spring的其它功能整合,比如前面提及的事务管理。
OXM 模块提供了对OXM实现的支持,比如JAXB、Castor、XML Beans、JiBX、XStream等。
JMS 模块包含生产(produce)和消费(consume)消息的功能。从Spring 4.1开始,集成了spring-messaging模块。。
Transactions事务模块为实现特殊接口类及所有的 POJO 支持编程式和声明式事务管理。(注:编程式事务需要自己写beginTransaction()、commit()、rollback()等事务管理方法,声明式事务是通过注解或配置由spring自动处理,编程式事务粒度更细)
事务管理:我们在实际业务场景中,经常会遇到数据频繁修改读取的问题。在同一时刻,不同的业务逻辑对同一个表数据进行修改,这种冲突很可能造成数据不可挽回的错乱,所以我们需要用事务来对数据进行管理。事务必须服从ACID原则。ACID指的是原子性(atomicity)、一致性(consistency)、隔离性(isolation)和持久性(durability)。 通俗理解,事务其实就是一系列指令的集合。原子性:操作这些指令时,要么全部执行成功,要么全部不执行。只要其中一个指令执行失败,所有的指令都执行失败,数据进行回滚,回到执行指令前的数据状态。 一致性:事务的执行使数据从一个状态转换为另一个状态,但是对于整个数据的完整性保持稳定。 隔离性:在该事务执行的过程中,无论发生的任何数据的改变都应该只存在于该事务之中,对外界不存在任何影响。只有在事务确定正确提交之后,才会显示该事务对数据的改变。其他事务才能获取到这些改变后的数据。 持久性:当事务正确完成后,它对于数据的改变是永久性的。
2.3 Web
Web,Web-MVC,Web-Socket 和 Web-Portlet
Web 模块提供面向web的基本功能和面向web的应用上下文,比如多部分(multipart)文件上传功能、使用Servlet监听器初始化IoC容器等。它还包括HTTP客户端以及Spring远程调用中与web相关的部分。。
Web-MVC 模块为web应用提供了模型视图控制(MVC)和REST Web服务的实现。Spring的MVC框架可以使领域模型代码和web表单完全地分离,且可以与Spring框架的其它所有功能进行集成。
Web-Socket 模块为 WebSocket-based 提供了支持,而且在 web 应用程序中提供了客户端和服务器端之间通信的两种方式。
Web-Portlet 模块提供了用于Portlet环境的MVC实现,并反映了spring-webmvc模块的功能。
2.4 其他
AOP 模块提供了面向方面的编程实现,允许你定义方法拦截器和切入点对代码进行干净地解耦,从而使实现功能的代码彻底的解耦出来。使用源码级的元数据,可以用类似于.Net属性的方式合并行为信息到代码中。
Aspects 模块提供了与 AspectJ 的集成,这是一个功能强大且成熟的面向切面编程(AOP)框架。
Instrumentation 模块在一定的应用服务器中提供了类 instrumentation 的支持和类加载器的实现。
Messaging 模块为 STOMP 提供了支持作为在应用程序中 WebSocket 子协议的使用。它也支持一个注解编程模型,它是为了选路和处理来自 WebSocket 客户端的 STOMP 信息。
测试模块支持对具有 JUnit 或 TestNG 框架的 Spring 组件的测试。
3、Spring IoC容器
Spring 容器是 Spring 框架的核心。容器将创建对象,把它们连接在一起,配置它们,并管理他们的整个生命周期从创建到销毁。Spring 容器使用依赖注入(DI)来管理组成一个应用程序的组件。这些对象被称为 Spring Beans。
Spring IoC 容器利用 Java 的 POJO 类和配置元数据来生成完全配置和可执行的系统或应用程序。
3.1 容器的种类
- Spring BeanFactory 容器
它是最简单的容器,给 DI 提供了基本的支持,它用 org.springframework.beans.factory.BeanFactory 接口来定义。
XmlBeanFactory beanFac = new XmlBeanFactory (new ClassPathResource("Beans.xml"));
Helloworld objBeanFac = (Helloworld) beanFac.getBean("helloWorld");//获得所需的 bean,对应bean的id
objBeanFac.getMessage();
- Spring ApplicationContext 容器
该容器添加了更多的企业特定的功能,例如从一个属性文件中解析文本信息的能力,发布应用程序事件给感兴趣的事件监听器的能力。该容器是由 org.springframework.context.ApplicationContext 接口定义。
ApplicationContext 容器包括 BeanFactory 容器的所有功能
//    	ApplicationContext appContext = new FileSystemXmlApplicationContext ("E:/SoftwareCodes/Java/Spring_Test/test/src/main/java/Beans.xml");//创建应用程序的上下文
        ApplicationContext appContext = new ClassPathXmlApplicationContext("Beans.xml");//创建应用程序的上下文
        Helloworld objAppContext = (Helloworld) appContext.getBean("helloWorld");
        objAppContext.getMessage();
3.2 Bean定义
| 属性 | 描述 |
|---|---|
| class | 这个属性是强制性的,并且指定用来创建 bean 的 bean 类。 |
| name | 这个属性指定唯一的 bean 标识符。在基于 XML 的配置元数据中,你可以使用 ID 和/或 name 属性来指定 bean 标识符。 |
| scope | 这个属性指定由特定的 bean 定义创建的对象的作用域,它将会在 bean 作用域的章节中进行讨论。 |
| constructor-arg | 它是用来注入依赖关系的,并会在接下来的章节中进行讨论。 |
| properties | 它是用来注入依赖关系的,并会在接下来的章节中进行讨论。 |
| autowiring mode | 它是用来注入依赖关系的,并会在接下来的章节中进行讨论。 |
| lazy-initialization mode | 延迟初始化的 bean 告诉 IoC 容器在它第一次被请求时,而不是在启动时去创建一个 bean 实例。 |
| initialization方法 | 在 bean 的所有必需的属性被容器设置之后,调用回调方法。它将会在 bean 的生命周期章节中进行讨论。 |
| destruction方法 | 当包含该 bean 的容器被销毁时,使用回调方法。它将会在 bean 的生命周期章节中进行讨论。 |
3.3 Bean作用域
scope属性
| 作用域 | 描述 |
|---|---|
| singleton | 在spring IoC容器仅存在一个Bean实例,Bean以单例方式存在,默认值。每次需要时(getBean)都返回同一个bean实例。 |
| prototype | 每次从容器中调用Bean时,都返回一个新的实例,即每次调用getBean()时,相当于执行newXxxBean() |
| request | 每次HTTP请求都会创建一个新的Bean,该作用域仅适用于WebApplicationContext环境 |
| session | 同一个HTTP Session共享一个Bean,不同Session使用不同的Bean,仅适用于WebApplicationContext环境 |
| global-session | 一般用于Portlet应用环境,该运用域仅适用于WebApplicationContext环境 |
singleton
Singleton是单例类型,就是在创建起容器时就同时自动创建了一个bean的对象,不管你是否使用,他都存在了,每次获取到的对象都是同一个对象。注意,Singleton作用域是Spring中的缺省作用域。
<!-- A bean definition with singleton scope -->
<bean id="..." class="..." scope="singleton">
    <!-- collaborators and configuration for this bean go here -->
</bean>
prototype
Prototype是原型类型,它在我们创建容器的时候并没有实例化,而是当我们获取bean的时候才会去创建一个对象,而且我们每次获取到的对象都不是同一个对象。
3.4 Bean生命周期
当一个 bean 被实例化时,它可能需要执行一些初始化使它转换成可用状态。同样,当 bean 不再需要,并且从容器中移除时,可能需要做一些清除工作。
为了定义安装和拆卸一个 bean,我们只要声明带有 init-method 和/或 destroy-method 参数的 。init-method 属性指定一个方法,在实例化 bean 时,立即调用该方法。同样,destroy-method 指定一个方法,只有从容器中移除 bean 之后,才能调用该方法。
单独设置初始化和销毁方法
<?xml version="1.0" encoding="UTF-8"?>
<!-- Beans.xml 用于给不同的 bean 分配唯一的 ID ,并且控制不同值的对象的创建,而不会影响 Spring 的任何源文件。-->
<!-- 例如,使用下面的文件,你可以为 “message” 变量传递任何值,因此你就可以输出信息的不同值,而不会影响的 HelloWorld.java和MainApp.java 文件。 -->
<beans xmlns="http://www.springframework.org/schema/beans"
    xmlns:xsi="http://www.w3.org/2001/XMLSchema-instance"
    xsi:schemaLocation="http://www.springframework.org/schema/beans
    http://www.springframework.org/schema/beans/spring-beans-3.0.xsd">

<!--scope="prototype"--><!--scope Bean作用域-->
<!--init-method="init"--><!--bean实例化时调用的方法-->
<!--destroy-method="destroy"--><!--容器移除bean时调用的方法-->
   <bean id="helloWorld" class="com.neyzoter.test.Helloworld"
   	init-method="init" destroy-method="destroy">
       <property name="message" value="Hello World!"/>
   </bean>

</beans>
默认的初始化和销毁方法
<beans xmlns="http://www.springframework.org/schema/beans"
    xmlns:xsi="http://www.w3.org/2001/XMLSchema-instance"
    xsi:schemaLocation="http://www.springframework.org/schema/beans
    http://www.springframework.org/schema/beans/spring-beans-3.0.xsd"
    default-init-method="init"
    default-destroy-method="destroy">

   <bean id="..." class="...">
       <!-- collaborators and configuration for this bean go here -->
   </bean>

</beans>
AbstractApplicationContext 类中声明的关闭 hook 的 registerShutdownHook() 方法
package com.neyzoter.test;
import org.springframework.context.support.AbstractApplicationContext;
import org.springframework.context.support.ClassPathXmlApplicationContext;
public class MainApp {
   public static void main(String[] args) {
      AbstractApplicationContext context = new ClassPathXmlApplicationContext("Beans.xml");
      HelloWorld obj = (HelloWorld) context.getBean("helloWorld");
      obj.getMessage();
      context.registerShutdownHook();
   }
}
package com.neyzoter.test;

public class HelloWorld {
   private String message;

   public void setMessage(String message){
      this.message  = message;
   }
   public void getMessage(){
      System.out.println("Your Message : " + message);
   }
   public void init(){
      System.out.println("Bean is going through init.");
   }
   public void destroy(){
      System.out.println("Bean will destroy now.");
   }
}
3.5 Bean后置处理器
BeanPostProcessor 接口定义回调方法,你可以实现该方法来提供自己的实例化逻辑,依赖解析逻辑等。你也可以在 Spring 容器通过插入一个或多个 BeanPostProcessor 的实现来完成实例化,配置和初始化一个bean之后实现一些自定义逻辑回调方法。
可以在bean初始化(调用helloworld的init方法)前,自动调用postProcessBeforeInitialization;初始化后自动调用postProcessAfterInitialization。
运行顺序:property(属性设置,即set函数) -> postProcessBeforeInitialization方法 ->
xml指定的init-method方法 -> postProcessAfterInitialization方法 -> ……
-> context.registerShutdownHook关闭 -> xml指定的destroy-method方法
//HelloWorld.java
package com.tutorialspoint;
public class HelloWorld {
   private String message;
   public void setMessage(String message){
      this.message  = message;
	  System.out.println("Setted Message : " + message);
   }
   public void getMessage(){
      System.out.println("Your Message : " + message);
   }
   public void init(){
      System.out.println("Bean is going through init.");
   }
   public void destroy(){
      System.out.println("Bean will destroy now.");
   }
}
package com.tutorialspoint;
import org.springframework.context.support.AbstractApplicationContext;
import org.springframework.context.support.ClassPathXmlApplicationContext;
public class MainApp {
   public static void main(String[] args) {
      AbstractApplicationContext context = new ClassPathXmlApplicationContext("Beans.xml");
      HelloWorld obj = (HelloWorld) context.getBean("helloWorld");
      obj.getMessage();
      context.registerShutdownHook();
   }
}
//InitHelloWorld.java
package com.tutorialspoint;
import org.springframework.beans.factory.config.BeanPostProcessor;
import org.springframework.beans.BeansException;
public class InitHelloWorld implements BeanPostProcessor {
   public Object postProcessBeforeInitialization(Object bean, String beanName) throws BeansException {
      System.out.println("BeforeInitialization : " + beanName);
      return bean;  // you can return any other object as well
   }
   public Object postProcessAfterInitialization(Object bean, String beanName) throws BeansException {
      System.out.println("AfterInitialization : " + beanName);
      return bean;  // you can return any other object as well
   }
}
怎么样去掉这个InitHelloWorld?:使用@PostConstruct和@PreDestroy。见[依赖注入]
<?xml version="1.0" encoding="UTF-8"?>

<beans xmlns="http://www.springframework.org/schema/beans"
    xmlns:xsi="http://www.w3.org/2001/XMLSchema-instance"
    xsi:schemaLocation="http://www.springframework.org/schema/beans
    http://www.springframework.org/schema/beans/spring-beans-3.0.xsd">

   <bean id="helloWorld" class="com.tutorialspoint.HelloWorld"
       init-method="init" destroy-method="destroy">
       <property name="message" value="Hello World!"/>
   </bean>

   <bean class="com.tutorialspoint.InitHelloWorld" />

</beans>
输出
Setted Message : Hello World!
BeforeInitialization : helloWorld
Bean is going through init.
AfterInitialization : helloWorld
Your Message : Hello World!
Bean will destroy now.
运行顺序:property(属性设置,即set函数) -> postProcessBeforeInitialization方法 ->
xml指定的init-method方法 -> postProcessAfterInitialization方法 -> ……
-> context.registerShutdownHook关闭 -> xml指定的destroy-method方法
3.6 Bean定义继承
bean 定义可以包含很多的配置信息,包括构造函数的参数,属性值,容器的具体信息例如初始化方法,静态工厂方法名,等等。
子 bean 的定义继承父定义的配置数据。子定义可以根据需要重写一些值,或者添加其他值。
Spring Bean 定义的继承与 Java 类的继承无关,但是继承的概念是一样的。你可以定义一个父 bean 的定义作为模板和其他子 bean 就可以从父 bean 中继承所需的配置。
当你使用基于 XML 的配置元数据时,通过使用父属性,指定父 bean 作为该属性的值来表明子 bean 的定义。
<?xml version="1.0" encoding="UTF-8"?>

<beans xmlns="http://www.springframework.org/schema/beans"
    xmlns:xsi="http://www.w3.org/2001/XMLSchema-instance"
    xsi:schemaLocation="http://www.springframework.org/schema/beans
    http://www.springframework.org/schema/beans/spring-beans-3.0.xsd">

   <bean id="helloWorld" class="com.tutorialspoint.HelloWorld">
      <property name="message1" value="Hello World!"/>
      <property name="message2" value="Hello Second World!"/>
   </bean>

   <bean id="helloIndia" class="com.tutorialspoint.HelloIndia" parent="helloWorld">
      <property name="message1" value="Hello India!"/>
      <property name="message3" value="Namaste India!"/>
   </bean>

</beans>
package com.tutorialspoint;
public class HelloWorld {
   private String message1;
   private String message2;
   public void setMessage1(String message){
      this.message1  = message;
   }
   public void setMessage2(String message){
      this.message2  = message;
   }
   public void getMessage1(){
      System.out.println("World Message1 : " + message1);
   }
   public void getMessage2(){
      System.out.println("World Message2 : " + message2);
   }
}
package com.tutorialspoint;

public class HelloIndia {
   private String message1;
   private String message2;
   private String message3;

   public void setMessage1(String message){
      this.message1  = message;
   }

   public void setMessage2(String message){
      this.message2  = message;
   }

   public void setMessage3(String message){
      this.message3  = message;
   }

   public void getMessage1(){
      System.out.println("India Message1 : " + message1);
   }

   public void getMessage2(){
      System.out.println("India Message2 : " + message2);
   }

   public void getMessage3(){
      System.out.println("India Message3 : " + message3);
   }
}
package com.tutorialspoint;

import org.springframework.context.ApplicationContext;
import org.springframework.context.support.ClassPathXmlApplicationContext;

public class MainApp {
   public static void main(String[] args) {
      ApplicationContext context = new ClassPathXmlApplicationContext("Beans.xml");

      HelloWorld objA = (HelloWorld) context.getBean("helloWorld");

      objA.getMessage1();
      objA.getMessage2();

      HelloIndia objB = (HelloIndia) context.getBean("helloIndia");
      objB.getMessage1();
      objB.getMessage2();
      objB.getMessage3();
   }
}
输出
World Message1 : Hello World!
World Message2 : Hello Second World!
India Message1 : Hello India!
India Message2 : Hello Second World!
India Message3 : Namaste India!
Bean定义模板
创建一个 Bean 定义模板,不需要花太多功夫它就可以被其他子 bean 定义使用。在定义一个 Bean 定义模板时,你不应该指定类的属性,而应该指定带 true 值的抽象属性
<?xml version="1.0" encoding="UTF-8"?>

<beans xmlns="http://www.springframework.org/schema/beans"
    xmlns:xsi="http://www.w3.org/2001/XMLSchema-instance"
    xsi:schemaLocation="http://www.springframework.org/schema/beans
    http://www.springframework.org/schema/beans/spring-beans-3.0.xsd">
<!-- 父 bean 自身不能被实例化,因为它是不完整的,而且它也被明确地标记为抽象的。当一个定义是抽象的,它仅仅作为一个纯粹的模板 bean 定义来使用的,充当子定义的父定义使用。 -->
   <bean id="beanTeamplate" abstract="true">
      <property name="message1" value="Hello World!"/>
      <property name="message2" value="Hello Second World!"/>
      <property name="message3" value="Namaste India!"/>
   </bean>

   <bean id="helloIndia" class="com.tutorialspoint.HelloIndia" parent="beanTeamplate">
      <property name="message1" value="Hello India!"/>
      <property name="message3" value="Namaste India!"/>
   </bean>

</beans>
4、Spring依赖注入
每个基于应用程序的 java 都有几个对象,这些对象一起工作来呈现出终端用户所看到的工作的应用程序。当编写一个复杂的 Java 应用程序时,应用程序类应该尽可能独立于其他 Java 类来增加这些类重用的可能性,并且在做单元测试时,测试独立于其他类的独立性。依赖注入(或有时称为布线)有助于把这些类粘合在一起,同时保持他们独立。
如果你要把一个引用传递给一个对象,那么你需要使用 标签的 ref 属性,而如果你要直接传递一个值,那么你应该使用 value 属性。
4.1 基于构造函数的依赖注入
当容器调用带有多个参数的构造函数类时,实现基于构造函数的 DI,每个代表在其他类中的一个依赖关系。
public class TextEditor {
   private SpellChecker spellChecker;
   public TextEditor(SpellChecker spellChecker) {
      this.spellChecker = spellChecker;
   }
}
在这里,TextEditor 不应该担心 SpellChecker 的实现。SpellChecker 将会独立实现,并且在 TextEditor 实例化的时候将提供给 TextEditor,整个过程是由 Spring 框架的控制。
在这里,我们已经从 TextEditor 中删除了全面控制,并且把它保存到其他地方(即 XML 配置文件),且依赖关系(即 SpellChecker 类)通过类构造函数被注入到 TextEditor 类中。因此,控制流通过依赖注入(DI)已经“反转”,因为你已经有效地委托依赖关系到一些外部系统。
例子
//TextEditor.java
package com.tutorialspoint;
public class TextEditor {
   private SpellChecker spellChecker;
   public TextEditor(SpellChecker spellChecker) {
      System.out.println("Inside TextEditor constructor." );
      this.spellChecker = spellChecker;
   }
   public void spellCheck() {
      spellChecker.checkSpelling();
   }
}
//SpellChecker.java
package com.tutorialspoint;
public class SpellChecker {
   public SpellChecker(){
      System.out.println("Inside SpellChecker constructor." );
   }
   public void checkSpelling() {
      System.out.println("Inside checkSpelling." );
   }
}
//MainApp.java
package com.tutorialspoint;
import org.springframework.context.ApplicationContext;
import org.springframework.context.support.ClassPathXmlApplicationContext;
public class MainApp {
   public static void main(String[] args) {
      ApplicationContext context =
             new ClassPathXmlApplicationContext("Beans.xml");
      TextEditor te = (TextEditor) context.getBean("textEditor");
      te.spellCheck();
   }
}
<?xml version="1.0" encoding="UTF-8"?>

<beans xmlns="http://www.springframework.org/schema/beans"
    xmlns:xsi="http://www.w3.org/2001/XMLSchema-instance"
    xsi:schemaLocation="http://www.springframework.org/schema/beans
    http://www.springframework.org/schema/beans/spring-beans-3.0.xsd">

   <!-- Definition for textEditor bean -->
   <bean id="textEditor" class="com.tutorialspoint.TextEditor">
      <constructor-arg ref="spellChecker"/>
   </bean>

   <!-- Definition for spellChecker bean -->
   <bean id="spellChecker" class="com.tutorialspoint.SpellChecker">
   </bean>

</beans>
注:constructor-arg没有指定,如果要传入多个参数,需要按照顺序。见下面例子
package x.y;
public class Foo {
   public Foo(Bar bar, Baz baz) {
      // ...
   }
}
<beans>
   <bean id="foo" class="x.y.Foo">
      <constructor-arg ref="bar"/>
      <constructor-arg ref="baz"/>
   </bean>

   <bean id="bar" class="x.y.Bar"/>
   <bean id="baz" class="x.y.Baz"/>
</beans>
4.2 基于setter方法的依赖注入
基于 setter 方法的 DI 是通过在调用无参数的构造函数或无参数的静态工厂方法实例化 bean 之后容器调用 beans 的 setter 方法来实现的。
代码是 DI 原理的清洗机,当对象与它们的依赖关系被提供时,解耦效果更明显。对象不查找它的依赖关系,也不知道依赖关系的位置或类,而这一切都由 Spring 框架控制的。
//TextEditor.java
package com.tutorialspoint;
public class TextEditor {
   private SpellChecker spellChecker;
   // a setter method to inject the dependency.
   public void setSpellChecker(SpellChecker spellChecker) {
      System.out.println("Inside setSpellChecker." );
      this.spellChecker = spellChecker;
   }
   // a getter method to return spellChecker
   public SpellChecker getSpellChecker() {
      return spellChecker;
   }
   public void spellCheck() {
      spellChecker.checkSpelling();
   }
}
//SpellChecker.java
package com.tutorialspoint;
public class SpellChecker {
   public SpellChecker(){
      System.out.println("Inside SpellChecker constructor." );
   }
   public void checkSpelling() {
      System.out.println("Inside checkSpelling." );
   }
}
//MainApp.java
package com.tutorialspoint;
import org.springframework.context.ApplicationContext;
import org.springframework.context.support.ClassPathXmlApplicationContext;
public class MainApp {
   public static void main(String[] args) {
      ApplicationContext context =
             new ClassPathXmlApplicationContext("Beans.xml");
      TextEditor te = (TextEditor) context.getBean("textEditor");
      te.spellCheck();
   }
}
<?xml version="1.0" encoding="UTF-8"?>

<beans xmlns="http://www.springframework.org/schema/beans"
    xmlns:xsi="http://www.w3.org/2001/XMLSchema-instance"
    xsi:schemaLocation="http://www.springframework.org/schema/beans
    http://www.springframework.org/schema/beans/spring-beans-3.0.xsd">

   <!-- Definition for textEditor bean -->
   <bean id="textEditor" class="com.tutorialspoint.TextEditor">
      <property name="spellChecker" ref="spellChecker"/>
   </bean>

   <!-- Definition for spellChecker bean -->
   <bean id="spellChecker" class="com.tutorialspoint.SpellChecker">
   </bean>

</beans>
4.3 内部Beans的依赖注入
也就是将一个bean写入到另外一个bean内
<?xml version="1.0" encoding="UTF-8"?>

<beans xmlns="http://www.springframework.org/schema/beans"
    xmlns:xsi="http://www.w3.org/2001/XMLSchema-instance"
    xsi:schemaLocation="http://www.springframework.org/schema/beans
    http://www.springframework.org/schema/beans/spring-beans-3.0.xsd">

   <bean id="outerBean" class="...">
      <property name="target">
         <bean id="innerBean" class="..."/>
      </property>
   </bean>

</beans>
4.4 注入集合
| 元素 | 描述 |
|---|---|
| <list> | 它有助于连线,如注入一列值,允许重复。 |
| <set> | 它有助于连线一组值,但不能重复。 |
| <map> | 它可以用来注入名称-值对的集合,其中名称和值可以是任何类型。 |
| <props> | 它可以用来注入名称-值对的集合,其中名称和值都是字符串类型。 |
你可以使用或
package com.tutorialspoint;
import java.util.*;
public class JavaCollection {
   List addressList;
   Set  addressSet;
   Map  addressMap;
   Properties addressProp;
   // a setter method to set List
   public void setAddressList(List addressList) {
      this.addressList = addressList;
   }
   // prints and returns all the elements of the list.
   public List getAddressList() {
      System.out.println("List Elements :"  + addressList);
      return addressList;
   }
   // a setter method to set Set
   public void setAddressSet(Set addressSet) {
      this.addressSet = addressSet;
   }
   // prints and returns all the elements of the Set.
   public Set getAddressSet() {
      System.out.println("Set Elements :"  + addressSet);
      return addressSet;
   }
   // a setter method to set Map
   public void setAddressMap(Map addressMap) {
      this.addressMap = addressMap;
   }
   // prints and returns all the elements of the Map.
   public Map getAddressMap() {
      System.out.println("Map Elements :"  + addressMap);
      return addressMap;
   }
   // a setter method to set Property
   public void setAddressProp(Properties addressProp) {
      this.addressProp = addressProp;
   }
   // prints and returns all the elements of the Property.
   public Properties getAddressProp() {
      System.out.println("Property Elements :"  + addressProp);
      return addressProp;
   }
}
<?xml version="1.0" encoding="UTF-8"?>

<beans xmlns="http://www.springframework.org/schema/beans"
    xmlns:xsi="http://www.w3.org/2001/XMLSchema-instance"
    xsi:schemaLocation="http://www.springframework.org/schema/beans
    http://www.springframework.org/schema/beans/spring-beans-3.0.xsd">

   <!-- Definition for javaCollection -->
   <bean id="javaCollection" class="com.tutorialspoint.JavaCollection">

      <!-- results in a setAddressList(java.util.List) call -->
      <property name="addressList">
         <list>
            <value>INDIA</value>
            <value>Pakistan</value>
            <value>USA</value>
            <value>USA</value>
         </list>
      </property>

      <!-- results in a setAddressSet(java.util.Set) call -->
      <property name="addressSet">
         <set>
            <value>INDIA</value>
            <value>Pakistan</value>
            <value>USA</value>
            <value>USA</value>
        </set>
      </property>

      <!-- results in a setAddressMap(java.util.Map) call -->
      <property name="addressMap">
         <map>
            <entry key="1" value="INDIA"/>
            <entry key="2" value="Pakistan"/>
            <entry key="3" value="USA"/>
            <entry key="4" value="USA"/>
         </map>
      </property>

      <!-- results in a setAddressProp(java.util.Properties) call -->
      <property name="addressProp">
         <props>
            <prop key="one">INDIA</prop>
            <prop key="two">Pakistan</prop>
            <prop key="three">USA</prop>
            <prop key="four">USA</prop>
         </props>
      </property>

   </bean>

</beans>
注入null
<bean id="..." class="exampleBean">
   <property name="email"><null/></property>
</bean>
5、Beans自动装配
5.1 byName
<?xml version="1.0" encoding="UTF-8"?>

<beans xmlns="http://www.springframework.org/schema/beans"
    xmlns:xsi="http://www.w3.org/2001/XMLSchema-instance"
    xsi:schemaLocation="http://www.springframework.org/schema/beans
    http://www.springframework.org/schema/beans/spring-beans-3.0.xsd">

   <!-- Definition for textEditor bean -->
   <bean id="textEditor" class="com.tutorialspoint.TextEditor"
      autowire="byName">  <!-- 名称自动装配 -->
      <property name="name" value="Generic Text Editor" />
   </bean>

   <!-- Definition for spellChecker bean -->
   <bean id="spellChecker" class="com.tutorialspoint.SpellChecker">
   </bean>

</beans>
5.2 byType
<?xml version="1.0" encoding="UTF-8"?>

<beans xmlns="http://www.springframework.org/schema/beans"
    xmlns:xsi="http://www.w3.org/2001/XMLSchema-instance"
    xsi:schemaLocation="http://www.springframework.org/schema/beans
    http://www.springframework.org/schema/beans/spring-beans-3.0.xsd">

   <!-- Definition for textEditor bean -->
   <bean id="textEditor" class="com.tutorialspoint.TextEditor"
      autowire="byType">  <!-- 类型自动转配 -->
      <property name="name" value="Generic Text Editor" />
   </bean>

   <!-- Definition for spellChecker bean -->
   <bean id="SpellChecker" class="com.tutorialspoint.SpellChecker">
   </bean>

</beans>
5.3 构造函数自动转配
<?xml version="1.0" encoding="UTF-8"?>

<beans xmlns="http://www.springframework.org/schema/beans"
    xmlns:xsi="http://www.w3.org/2001/XMLSchema-instance"
    xsi:schemaLocation="http://www.springframework.org/schema/beans
    http://www.springframework.org/schema/beans/spring-beans-3.0.xsd">

   <!-- Definition for textEditor bean -->
   <bean id="textEditor" class="com.tutorialspoint.TextEditor"
      autowire="constructor">  <!-- 构造函数自动转配 -->
      <constructor-arg value="Generic Text Editor"/>
   </bean>

   <!-- Definition for spellChecker bean -->
   <bean id="SpellChecker" class="com.tutorialspoint.SpellChecker">
   </bean>

</beans>
6、基于注解的配置
使用注解来实现配置,则xml文件配置如下。
<?xml version="1.0" encoding="UTF-8"?>

<beans xmlns="http://www.springframework.org/schema/beans"
    xmlns:xsi="http://www.w3.org/2001/XMLSchema-instance"
    xmlns:context="http://www.springframework.org/schema/context"
    xsi:schemaLocation="http://www.springframework.org/schema/beans
    http://www.springframework.org/schema/beans/spring-beans-3.0.xsd
    http://www.springframework.org/schema/context
    http://www.springframework.org/schema/context/spring-context-3.0.xsd">

   <context:annotation-config/>  <!-- 基于注解的配置开始  -->
   <!-- bean definitions go here -->

</beans>
注解包括
@Required
@Qualifier
@Autowired
@PostConstruct
@PreDestroy
@Resource
6.1 @Required
@Required 注释应用于 bean 属性的 setter 方法,它表明受影响的 bean 属性在配置时必须放在 XML 配置文件中,否则容器就会抛出一个 BeanInitializationException 异常。
package com.tutorialspoint;
import org.springframework.beans.factory.annotation.Required;
public class Student {
   private Integer age;
   private String name;
   @Required
   public void setAge(Integer age) {
      this.age = age;
   }
   public Integer getAge() {
      return age;
   }
   @Required
   public void setName(String name) {
      this.name = name;
   }
   public String getName() {
      return name;
   }
}
<?xml version="1.0" encoding="UTF-8"?>

<beans xmlns="http://www.springframework.org/schema/beans"
    xmlns:xsi="http://www.w3.org/2001/XMLSchema-instance"
    xmlns:context="http://www.springframework.org/schema/context"
    xsi:schemaLocation="http://www.springframework.org/schema/beans
    http://www.springframework.org/schema/beans/spring-beans-3.0.xsd
    http://www.springframework.org/schema/context
    http://www.springframework.org/schema/context/spring-context-3.0.xsd">

   <context:annotation-config/>

   <!-- Definition for student bean -->
   <bean id="student" class="com.tutorialspoint.Student">
      <property name="name"  value="Zara" />
      <property name="age"  value="11"/>
   </bean>

</beans>
6.2 @Autowired和@Resource
6.2.1 @Autowired
@Autowired 注释可以在 setter 方法中被用于自动连接 bean,一个属性或者任意命名的可能带有多个参数的方法,只按照byType注入。
public class TestServiceImpl {
    // 下面两种@Autowired只要使用一种即可
    @Autowired
    private UserDao userDao; // 用于字段上

    @Autowired
    public void setUserDao(UserDao userDao) { // 用于属性的方法上
        this.userDao = userDao;
    }
}
如果按照byName装配,需要结合@Qualifier注解一起使用。
public class TestServiceImpl {
    @Autowired
    @Qualifier("userDao")
    private UserDao userDao;
}
6.2.2 @Resource
@Resource,默认按照byName自动注入,并不是Spring的注解,它的包是javax.annotation.Resource,需要导入,但是Spring支持该注解的注入。@Resource有两个重要的属性:name和type,而Spring将@Resource注解的name属性解析为bean的名字,而type属性则解析为bean的类型。
public class TestServiceImpl {
    // 下面两种@Resource只要使用一种即可
    @Resource(name="userDao")
    private UserDao userDao; // 用于字段上

    @Resource(name="userDao")
    public void setUserDao(UserDao userDao) { // 用于属性的setter方法上
        this.userDao = userDao;
    }
}
6.3 @Qualifier
package com.tutorialspoint;
import org.springframework.beans.factory.annotation.Autowired;
import org.springframework.beans.factory.annotation.Qualifier;
public class Profile {
   @Autowired
   @Qualifier("student1")  //指定student1这个bean
   private Student student;
   public Profile(){
      System.out.println("Inside Profile constructor." );
   }
   public void printAge() {
      System.out.println("Age : " + student.getAge() );
   }
   public void printName() {
      System.out.println("Name : " + student.getName() );
   }
}
<?xml version="1.0" encoding="UTF-8"?>

<beans xmlns="http://www.springframework.org/schema/beans"
    xmlns:xsi="http://www.w3.org/2001/XMLSchema-instance"
    xmlns:context="http://www.springframework.org/schema/context"
    xsi:schemaLocation="http://www.springframework.org/schema/beans
    http://www.springframework.org/schema/beans/spring-beans-3.0.xsd
    http://www.springframework.org/schema/context
    http://www.springframework.org/schema/context/spring-context-3.0.xsd">

   <context:annotation-config/>

   <!-- Definition for profile bean -->
   <bean id="profile" class="com.tutorialspoint.Profile">
   </bean>

   <!-- Definition for student1 bean -->
   <bean id="student1" class="com.tutorialspoint.Student">
      <property name="name"  value="Zara" />
      <property name="age"  value="11"/>
   </bean>

   <!-- Definition for student2 bean -->
   <bean id="student2" class="com.tutorialspoint.Student">
      <property name="name"  value="Nuha" />
      <property name="age"  value="2"/>
   </bean>

</beans>
6.4 @Scheduled和@Component
周期性运行一个程序
(1)被调用程序
package com.neyzoter.tasks
@Component("taskJob")
public class TaskJobs {
    //可作为调度任务
    //参数表示秒 分 时 日 月 星期
    //即每个月1号凌晨0点执行
    @Scheduled(cron="0 0 0 1 * ?")
    public void task1(){
        //do something
    }
}
(2)调用程序
package com.neyzoter.app
//扫描包内的带有@Component注解的类
@ComponentScan("com.neyzoter.tasks")
//使能调度
@EnableScheduling
public class TaskJobs {

}
6.5 JSR-250注释
为了定义一个 bean 的安装和卸载,我们使用 init-method 和/或 destroy-method 参数简单的声明一下 。init-method 属性指定了一个方法,该方法在 bean 的实例化阶段会立即被调用。同样地,destroy-method 指定了一个方法,该方法只在一个 bean 从容器中删除之前被调用。
@PostConstruct 注释作为初始化回调函数的一个替代;@PreDestroy 注释作为销毁回调函数的一个替代 ; @Resource 注释使用一个 ‘name’ 属性,该属性以一个 bean 名称的形式被注入。
@PostConstruct和@PreDestroy
package com.tutorialspoint;
import javax.annotation.*;
public class HelloWorld {
   private String message;
   public void setMessage(String message){
      this.message  = message;
   }
   public String getMessage(){
      System.out.println("Your Message : " + message);
      return message;
   }
   @PostConstruct   //注释作为初始化回调函数的一个替代
   public void init(){
      System.out.println("Bean is going through init.");
   }
   @PreDestroy    //注释作为销毁回调函数
   public void destroy(){
      System.out.println("Bean will destroy now.");
   }
}
<?xml version="1.0" encoding="UTF-8"?>

<beans xmlns="http://www.springframework.org/schema/beans"
    xmlns:xsi="http://www.w3.org/2001/XMLSchema-instance"
    xmlns:context="http://www.springframework.org/schema/context"
    xsi:schemaLocation="http://www.springframework.org/schema/beans
    http://www.springframework.org/schema/beans/spring-beans-3.0.xsd
    http://www.springframework.org/schema/context
    http://www.springframework.org/schema/context/spring-context-3.0.xsd">

   <context:annotation-config/>

   <bean id="helloWorld"
       class="com.tutorialspoint.HelloWorld"
       init-method="init" destroy-method="destroy">
       <property name="message" value="Hello World!"/>
   </bean>

</beans>
@ Resource
package com.tutorialspoint;
import javax.annotation.Resource;
public class TextEditor {
   private SpellChecker spellChecker;
   @Resource(name= "spellChecker")
   public void setSpellChecker( SpellChecker spellChecker ){
      this.spellChecker = spellChecker;
   }
   public SpellChecker getSpellChecker(){
      return spellChecker;
   }
   public void spellCheck(){
      spellChecker.checkSpelling();
   }
}
6.6 基于Java的配置
package com.tutorialspoint;
import org.springframework.context.annotation.*;
@Configuration
public class HelloWorldConfig {
   @Bean
   public HelloWorld helloWorld(){
      return new HelloWorld();
   }
}
package com.tutorialspoint;

public class HelloWorld {
   private String message;

   public void setMessage(String message){
      this.message  = message;
   }

   public void getMessage(){
      System.out.println("Your Message : " + message);
   }
}
不需要xml配置文件
一旦定义了配置类,你就可以使用 AnnotationConfigApplicationContext 来加载并把他们提供给 Spring 容器
public static void main(String[] args) {
   ApplicationContext ctx =
   new AnnotationConfigApplicationContext(HelloWorldConfig.class);
   HelloWorld helloWorld = ctx.getBean(HelloWorld.class);
   helloWorld.setMessage("Hello World!");
   helloWorld.getMessage();
}
6.7 bean事件处理
ApplicationContext负责管理 beans 的完整生命周期。当加载 beans 时,ApplicationContext 发布某些类型的事件。
例如,当上下文启动时,ContextStartedEvent 发布,当上下文停止时,ContextStoppedEvent 发布。
context的类型为ConfigurableApplicationContext 。
| 序号 | Spring 内置事件 & 描述 |
|---|---|
| 1 | ContextRefreshedEventApplicationContext 被初始化或刷新时,该事件被发布。这也可以在 ConfigurableApplicationContext 接口中使用 refresh() 方法来发生。 |
| 2 | ContextStartedEvent当使用 ConfigurableApplicationContext 接口中的 start() 方法启动 ApplicationContext 时,该事件被发布。你可以调查你的数据库,或者你可以在接受到这个事件后重启任何停止的应用程序。 |
| 3 | ContextStoppedEvent当使用 ConfigurableApplicationContext 接口中的 stop() 方法停止 ApplicationContext 时,发布这个事件。你可以在接受到这个事件后做必要的清理的工作。 |
| 4 | ContextClosedEvent当使用 ConfigurableApplicationContext 接口中的 close() 方法关闭 ApplicationContext 时,该事件被发布。一个已关闭的上下文到达生命周期末端;它不能被刷新或重启。 |
| 5 | RequestHandledEvent这是一个 web-specific 事件,告诉所有 bean HTTP 请求已经被服务。 |
package com.tutorialspoint;
public class HelloWorld {
   private String message;
   public void setMessage(String message){
      this.message  = message;
   }
   public void getMessage(){
      System.out.println("Your Message : " + message);
   }
}
//CStartEventHandler.java
package com.tutorialspoint;
import org.springframework.context.ApplicationListener;
import org.springframework.context.event.ContextStartedEvent;
public class CStartEventHandler
   implements ApplicationListener<ContextStartedEvent>{
   public void onApplicationEvent(ContextStartedEvent event) {
      System.out.println("ContextStartedEvent Received");
   }
}
//CStopEventHandler.java
package com.tutorialspoint;
import org.springframework.context.ApplicationListener;
import org.springframework.context.event.ContextStoppedEvent;
public class CStopEventHandler
   implements ApplicationListener<ContextStoppedEvent>{
   public void onApplicationEvent(ContextStoppedEvent event) {
      System.out.println("ContextStoppedEvent Received");
   }
}
package com.tutorialspoint;

import org.springframework.context.ConfigurableApplicationContext;
import org.springframework.context.support.ClassPathXmlApplicationContext;

public class MainApp {
   public static void main(String[] args) {
      ConfigurableApplicationContext context =   //contex类型为ConfigurableApplicationContext,需要start
      new ClassPathXmlApplicationContext("Beans.xml");

      // Let us raise a start event.
      context.start();

      HelloWorld obj = (HelloWorld) context.getBean("helloWorld");

      obj.getMessage();

      // Let us raise a stop event.
      context.stop();
   }
}
<?xml version="1.0" encoding="UTF-8"?>

<beans xmlns="http://www.springframework.org/schema/beans"
    xmlns:xsi="http://www.w3.org/2001/XMLSchema-instance"
    xsi:schemaLocation="http://www.springframework.org/schema/beans
    http://www.springframework.org/schema/beans/spring-beans-3.0.xsd">

   <bean id="helloWorld" class="com.tutorialspoint.HelloWorld">
      <property name="message" value="Hello World!"/>
   </bean>

   <bean id="cStartEventHandler"
         class="com.tutorialspoint.CStartEventHandler"/>

   <bean id="cStopEventHandler"
         class="com.tutorialspoint.CStopEventHandler"/>

</beans>
6.8 定时任务
1.配置beans.xml
<?xml version="1.0" encoding="UTF-8"?>


<beans xmlns="http://www.springframework.org/schema/beans"
    <!-- 其他内容 -->

	<!-- task的schema -->
    xmlns:task="http://www.springframework.org/schema/task"
    xsi:schemaLocation="
	<!-- 其他内容 -->

	<!-- task的schemaLocation -->
    http://www.springframework.org/schema/task
	http://www.springframework.org/schema/task/spring-task-4.1.xsd">

	<context:annotation-config/>  <!-- 基于注解的配置 -->

   	<context:component-scan base-package="com.sorl.backend" />  <!-- 开启扫描定时任务包 -->
   	<task:annotation-driven />

	<!--如果定时任务很多,可以配置executor线程池,这里executor的含义和java.util.concurrent.Executor是一样的,pool-size的大小官方推荐为5~10。scheduler的pool-size是ScheduledExecutorService线程池  -->
   	<task:scheduler id="scheduler" pool-size="5" />
	<task:annotation-driven executor="executor" scheduler="scheduler" />


	  <!-- 其他内容 -->
</beans>
2.编写任务
package com.sorl.backend;

import org.springframework.scheduling.annotation.Scheduled;
import org.springframework.stereotype.Component;

import org.apache.log4j.Logger;


/**
*
* MongoDB的历史数据清空指令,通过quartz每天调用
*
* @author  nesc420
* @Date    2019-5-7
* @version 0.1.0
*/
@Component("taskJob")
public class TaskJob{
	private final static Logger logger = Logger.getLogger(TestTools.class);

	//配置任务的执行时间,可以配置多个
	@Scheduled(cron="* * 4 * * ?")  //每天凌晨四点进行mgdClear任务
	public void mgdClear() {
		//mongodb数据库清除工作
	}

	@Scheduled(cron="5/5 * * * * ?") //5s后,每隔5s进行dispJob任务
	public void dispJob() {
		logger.info("disp Job ok");
	}

}
7、AOP
面向方面的编程(Aspect Oriented Programming,AOP)框架
面向方面的编程需要把程序逻辑分解成不同的部分称为所谓的关注点。跨一个应用程序的多个点的功能被称为横切关注点,这些横切关注点在概念上独立于应用程序的业务逻辑。有各种各样的常见的很好的方面的例子,如日志记录、审计、声明式事务、安全性和缓存等。
在 OOP 中,关键单元模块度是类,而在 AOP 中单元模块度是方面。
依赖注入帮助你对应用程序对象相互解耦和 AOP 可以帮助你从它们所影响的对象中对横切关注点解耦。
7.1 术语和通知类型
| 项 | 描述 |
|---|---|
| Aspect | 一个模块具有一组提供横切需求的 APIs。例如,一个日志模块为了记录日志将被 AOP 方面调用。应用程序可以拥有任意数量的方面,这取决于需求。 |
| Join point | 在你的应用程序中它代表一个点,你可以在插件 AOP 方面。你也能说,它是在实际的应用程序中,其中一个操作将使用 Spring AOP 框架。 |
| Advice | 这是实际行动之前或之后执行的方法。这是在程序执行期间通过 Spring AOP 框架实际被调用的代码。 |
| Pointcut | 这是一组一个或多个连接点,通知应该被执行。你可以使用表达式或模式指定切入点正如我们将在 AOP 的例子中看到的。 |
| Introduction | 引用允许你添加新方法或属性到现有的类中。 |
| Target object | 被一个或者多个方面所通知的对象,这个对象永远是一个被代理对象。也称为被通知对象。 |
| Weaving | Weaving 把方面连接到其它的应用程序类型或者对象上,并创建一个被通知的对象。这些可以在编译时,类加载时和运行时完成。 |
| 通知 | 注解 | 描述 |
|---|---|---|
| 前置通知 | @Before | 在一个方法执行之前,执行通知。 |
| 后置通知 | @After | 在一个方法执行之后,不考虑其结果,执行通知。 |
| 返回后通知 | @AfterReturning | 在一个方法执行之后,只有在方法成功完成时,才能执行通知。 |
| 抛出异常后通知 | @AfterThrowing | 在一个方法执行之后,只有在方法退出抛出异常时,才能执行通知。 |
| 环绕通知 | @Around | 在建议方法调用之前和之后,执行通知。 |
7.2 基于AOP的XML框架
使用注意点
-
getBean()时调用set函数设置参数时,不会调用AOP的通知方法。
-
在目标方法成功执行后时,会调用返回通知(After-rturning)
也就是说,就算方法没有return什么东西,也会抛出返回通知。需要针对不同的返回值或者没有返回值的方法进行不同的处理。比如打印返回值,如果没有返回值,要单独设置一下,避免出现NullPointer异常。
- 需要的jar包:
aspectjrt.jar

aspectjweaver.jar

aspectj.jar

aopalliance.jar
导入spring-aop 框架
<?xml version="1.0" encoding="UTF-8"?>
<beans xmlns="http://www.springframework.org/schema/beans"
    xmlns:xsi="http://www.w3.org/2001/XMLSchema-instance"
    xmlns:aop="http://www.springframework.org/schema/aop"
    xsi:schemaLocation="http://www.springframework.org/schema/beans
    http://www.springframework.org/schema/beans/spring-beans-3.0.xsd
    http://www.springframework.org/schema/aop
    http://www.springframework.org/schema/aop/spring-aop-3.0.xsd ">

   <!-- bean definition & AOP specific configuration -->

</beans>
声明一个aspect
<aop:config>
   <aop:aspect id="myAspect" ref="aBean">
   ...
   </aop:aspect>
</aop:config>
<bean id="aBean" class="...">
...
</bean>
声明一个切入点
指定某一些使用AOP的方法
<aop:config>
   <aop:aspect id="myAspect" ref="aBean">
   <aop:pointcut id="businessService"  <!-- 一组或者多个连接点 -->
      expression="execution(* com.xyz.myapp.service.*.*(..))"/>
   ...
   </aop:aspect>
</aop:config>
<bean id="aBean" class="...">
...
</bean>
声明建议
使用 <aop:{ADVICE NAME}> 元素在一个 中声明五个建议(也就是前置通知、后置通知……的处理函数)中的任何一个
<aop:config>
   <aop:aspect id="myAspect" ref="aBean">
      <aop:pointcut id="businessService"
         expression="execution(* com.xyz.myapp.service.*.*(..))"/>
      <!-- a before advice definition -->
      <aop:before pointcut-ref="businessService"
         method="doRequiredTask"/>
      <!-- an after advice definition -->
      <aop:after pointcut-ref="businessService"
         method="doRequiredTask"/>
      <!-- an after-returning advice definition -->
      <!--The doRequiredTask method must have parameter named retVal -->
      <aop:after-returning pointcut-ref="businessService"
         returning="retVal"
         method="doRequiredTask"/>
      <!-- an after-throwing advice definition -->
      <!--The doRequiredTask method must have parameter named ex -->
      <aop:after-throwing pointcut-ref="businessService"
         throwing="ex"
         method="doRequiredTask"/>
      <!-- an around advice definition -->
      <aop:around pointcut-ref="businessService"
         method="doRequiredTask"/>
   ...
   </aop:aspect>
</aop:config>
<bean id="aBean" class="...">
...
</bean>
基于AOP的XML架构示例——AOP实现日志
//Loggin.java 日志输出文件
package com.tutorialspoint;
public class Logging {
   /**
    * This is the method which I would like to execute
    * before a selected method execution.
    */
   public void beforeAdvice(){
      System.out.println("Going to setup student profile.");
   }
   /**
    * This is the method which I would like to execute
    * after a selected method execution.
    */
   public void afterAdvice(){
      System.out.println("Student profile has been setup.");
   }
   /**
    * This is the method which I would like to execute
    * when any method returns.
    */
   public void afterReturningAdvice(Object retVal){
      System.out.println("Returning:" + retVal.toString() );
   }
   /**
    * This is the method which I would like to execute
    * if there is an exception raised.
    */
   public void AfterThrowingAdvice(IllegalArgumentException ex){
      System.out.println("There has been an exception: " + ex.toString());
   }
}
//Student.java
package com.tutorialspoint;
public class Student {
   private Integer age;
   private String name;
   public void setAge(Integer age) {
      this.age = age;
   }
   public Integer getAge() {
      System.out.println("Age : " + age );
      return age;
   }
   public void setName(String name) {
      this.name = name;
   }
   public String getName() {
      System.out.println("Name : " + name );
      return name;
   }
   public void printThrowException(){
       System.out.println("Exception raised");
       throw new IllegalArgumentException();
   }
}
//MainApp.java
package com.tutorialspoint;
import org.springframework.context.ApplicationContext;
import org.springframework.context.support.ClassPathXmlApplicationContext;
public class MainApp {
   public static void main(String[] args) {
      ApplicationContext context =
             new ClassPathXmlApplicationContext("Beans.xml");
      Student student = (Student) context.getBean("student");
      student.getName();
      student.getAge();
      student.printThrowException();
   }
}
<?xml version="1.0" encoding="UTF-8"?>
<beans xmlns="http://www.springframework.org/schema/beans"
    xmlns:xsi="http://www.w3.org/2001/XMLSchema-instance"
    xmlns:aop="http://www.springframework.org/schema/aop"
    xsi:schemaLocation="http://www.springframework.org/schema/beans
    http://www.springframework.org/schema/beans/spring-beans-3.0.xsd
    http://www.springframework.org/schema/aop
    http://www.springframework.org/schema/aop/spring-aop-3.0.xsd ">

   <aop:config>
      <aop:aspect id="log" ref="logging">
         <aop:pointcut id="selectAll"
         expression="execution(* com.tutorialspoint.*.*(..))"/>
         <aop:before pointcut-ref="selectAll" method="beforeAdvice"/>
         <aop:after pointcut-ref="selectAll" method="afterAdvice"/>
         <aop:after-returning pointcut-ref="selectAll"
                              returning="retVal"
                              method="afterReturningAdvice"/>
         <aop:after-throwing pointcut-ref="selectAll"
                             throwing="ex"
                             method="AfterThrowingAdvice"/>
      </aop:aspect>
   </aop:config>

   <!-- Definition for student bean -->
   <bean id="student" class="com.tutorialspoint.Student">
      <property name="name"  value="Zara" />
      <property name="age"  value="11"/>
   </bean>

   <!-- Definition for logging aspect -->
   <bean id="logging" class="com.tutorialspoint.Logging"/>

</beans>
说明:getBean获取bean时调用了set方法,但是不会有前置、后置、返回、环绕通知。
如果java程序直接调用set方法,则会有通知。
输出
Going to setup student profile.    备注:beforeAdvice输出(在getName之前执行)
Name : Zara       备注:由getName输出
Student profile has been setup.     北周:afterAdvice输出(在getName之前执行)
Returning:Zara    备注:由afterReturningAdvice输出(getName返回了name)
Going to setup student profile.
Age : 11          备注:由getAge输出
Student profile has been setup.
Returning:11      备注:由afterReturningAdvice输出(getAge返回了age)
Going to setup student profile.
Exception raised
Student profile has been setup.
There has been an exception: java.lang.IllegalArgumentException
.....
other exception content
7.3 基于AOP的@AspectJ
在java程序中用注解,需要声明
<aop:aspectj-autoproxy/>
需要的jar包:
aspectjrt.jar

aspectjweaver.jar

aspectj.jar

aopalliance.jar
例子
package com.tutorialspoint;
import org.aspectj.lang.annotation.Aspect;
import org.aspectj.lang.annotation.Pointcut;
import org.aspectj.lang.annotation.Before;
import org.aspectj.lang.annotation.After;
import org.aspectj.lang.annotation.AfterThrowing;
import org.aspectj.lang.annotation.AfterReturning;
import org.aspectj.lang.annotation.Around;
@Aspect
public class Logging {
   /** Following is the definition for a pointcut to select
    *  all the methods available. So advice will be called
    *  for all the methods.
    */
	//声明一个执行对象为* com.tutorialspoint.*.*(..))的方法
   @Pointcut("execution(* com.tutorialspoint.*.*(..))")
   private void selectAll(){}
   /**
    * This is the method which I would like to execute
    *
    * before a selected method execution.
    */
   @Before("selectAll()")
   public void beforeAdvice(){
      System.out.println("Going to setup student profile.");
   }
   /**
    * This is the method which I would like to execute
    * after a selected method execution.
    */
   @After("selectAll()")
   public void afterAdvice(){
      System.out.println("Student profile has been setup.");
   }
   /**
    * This is the method which I would like to execute
    * when any method returns.
    */
   @AfterReturning(pointcut = "selectAll()", returning="retVal")
   public void afterReturningAdvice(Object retVal){
      System.out.println("Returning:" + retVal.toString() );
   }
   /**
    * This is the method which I would like to execute
    * if there is an exception raised by any method.
    */
   @AfterThrowing(pointcut = "selectAll()", throwing = "ex")
   public void AfterThrowingAdvice(IllegalArgumentException ex){
      System.out.println("There has been an exception: " + ex.toString());
   }
}
package com.tutorialspoint;
public class Student {
   private Integer age;
   private String name;
   public void setAge(Integer age) {
      this.age = age;
   }
   public Integer getAge() {
      System.out.println("Age : " + age );
      return age;
   }
   public void setName(String name) {
      this.name = name;
   }
   public String getName() {
      System.out.println("Name : " + name );
      return name;
   }
   public void printThrowException(){
      System.out.println("Exception raised");
      throw new IllegalArgumentException();
   }
}
package com.tutorialspoint;
import org.springframework.context.ApplicationContext;
import org.springframework.context.support.ClassPathXmlApplicationContext;
public class MainApp {
   public static void main(String[] args) {
      ApplicationContext context =
             new ClassPathXmlApplicationContext("Beans.xml");
      Student student = (Student) context.getBean("student");
      student.getName();
      student.getAge();
      student.printThrowException();
   }
}
<?xml version="1.0" encoding="UTF-8"?>
<beans xmlns="http://www.springframework.org/schema/beans"
    xmlns:xsi="http://www.w3.org/2001/XMLSchema-instance"
    xmlns:aop="http://www.springframework.org/schema/aop"
    xsi:schemaLocation="http://www.springframework.org/schema/beans
    http://www.springframework.org/schema/beans/spring-beans-3.0.xsd
    http://www.springframework.org/schema/aop
    http://www.springframework.org/schema/aop/spring-aop-3.0.xsd ">

    <aop:aspectj-autoproxy/>     <!-- 声明使用aspectj -->

   <!-- Definition for student bean -->
   <bean id="student" class="com.tutorialspoint.Student">
      <property name="name"  value="Zara" />
      <property name="age"  value="11"/>
   </bean>

   <!-- Definition for logging aspect -->
   <bean id="logging" class="com.tutorialspoint.Logging"/>

</beans>
8、Spring 的JDBC框架
在使用普通的 JDBC 数据库时,就会很麻烦的写不必要的代码来处理异常,打开和关闭数据库连接等。但 Spring JDBC 框架负责所有的低层细节,从开始打开连接,准备和执行 SQL 语句,处理异常,处理事务,到最后关闭连接。
数据源的配置
<bean id="dataSource"
class="org.springframework.jdbc.datasource.DriverManagerDataSource">
   <property name="driverClassName" value="com.mysql.jdbc.Driver"/>
   <property name="url" value="jdbc:mysql://localhost:3306/TEST"/>
   <property name="username" value="root"/>
   <property name="password" value="password"/>
</bean>
例子
实现mysql
CREATE TABLE Student(
   ID   INT NOT NULL AUTO_INCREMENT,
   NAME VARCHAR(20) NOT NULL,
   AGE  INT NOT NULL,
   PRIMARY KEY (ID)
);
具体函数:
//数据访问对象接口文件 StudentDAO.java
package com.tutorialspoint;
import java.util.List;
import javax.sql.DataSource;
public interface StudentDAO {
   /**
    * This is the method to be used to initialize
    * database resources ie. connection.
    */
   public void setDataSource(DataSource ds);
   /**
    * This is the method to be used to create
    * a record in the Student table.
    */
   public void create(String name, Integer age);
   /**
    * This is the method to be used to list down
    * a record from the Student table corresponding
    * to a passed student id.
    */
   public Student getStudent(Integer id);
   /**
    * This is the method to be used to list down
    * all the records from the Student table.
    */
   public List<Student> listStudents();
   /**
    * This is the method to be used to delete
    * a record from the Student table corresponding
    * to a passed student id.
    */
   public void delete(Integer id);
   /**
    * This is the method to be used to update
    * a record into the Student table.
    */
   public void update(Integer id, Integer age);
}
package com.tutorialspoint;
public class Student {
   private Integer age;
   private String name;
   private Integer id;
   public void setAge(Integer age) {
      this.age = age;
   }
   public Integer getAge() {
      return age;
   }
   public void setName(String name) {
      this.name = name;
   }
   public String getName() {
      return name;
   }
   public void setId(Integer id) {
      this.id = id;
   }
   public Integer getId() {
      return id;
   }
}
//StudentMapper.java
package com.tutorialspoint;
import java.sql.ResultSet;
import java.sql.SQLException;
import org.springframework.jdbc.core.RowMapper;
public class StudentMapper implements RowMapper<Student> {
	//输入采集到的数据
   public Student mapRow(ResultSet rs, int rowNum) throws SQLException {
      Student student = new Student();
      student.setId(rs.getInt("id"));
      student.setName(rs.getString("name"));
      student.setAge(rs.getInt("age"));
      return student;
   }
}
//DAO 接口 StudentDAO 的实现类文件 StudentJDBCTemplate.java
package com.tutorialspoint;
import java.util.List;
import javax.sql.DataSource;
import org.springframework.jdbc.core.JdbcTemplate;
public class StudentJDBCTemplate implements StudentDAO {
   private DataSource dataSource;
   private JdbcTemplate jdbcTemplateObject;
   public void setDataSource(DataSource dataSource) {
      this.dataSource = dataSource;
      this.jdbcTemplateObject = new JdbcTemplate(dataSource);
   }
   public void create(String name, Integer age) {
      String SQL = "insert into Student (name, age) values (?, ?)";
      jdbcTemplateObject.update( SQL, name, age);
      System.out.println("Created Record Name = " + name + " Age = " + age);
      return;
   }
   public Student getStudent(Integer id) {
      String SQL = "select * from Student where id = ?";
      Student student = jdbcTemplateObject.queryForObject(SQL,
                        new Object[]{id}, new StudentMapper());
      return student;
   }
   public List<Student> listStudents() {
      String SQL = "select * from Student";
      List <Student> students = jdbcTemplateObject.query(SQL,
                                new StudentMapper());
      return students;
   }
   public void delete(Integer id){
      String SQL = "delete from Student where id = ?";
      jdbcTemplateObject.update(SQL, id);
      System.out.println("Deleted Record with ID = " + id );
      return;
   }
   public void update(Integer id, Integer age){
      String SQL = "update Student set age = ? where id = ?";
      jdbcTemplateObject.update(SQL, age, id);
      System.out.println("Updated Record with ID = " + id );
      return;
   }
}
package com.tutorialspoint;
import java.util.List;
import org.springframework.context.ApplicationContext;
import org.springframework.context.support.ClassPathXmlApplicationContext;
import com.tutorialspoint.StudentJDBCTemplate;
public class MainApp {
   public static void main(String[] args) {
      ApplicationContext context =
             new ClassPathXmlApplicationContext("Beans.xml");
      StudentJDBCTemplate studentJDBCTemplate =
      (StudentJDBCTemplate)context.getBean("studentJDBCTemplate");
      System.out.println("------Records Creation--------" );
      studentJDBCTemplate.create("Zara", 11);
      studentJDBCTemplate.create("Nuha", 2);
      studentJDBCTemplate.create("Ayan", 15);
      System.out.println("------Listing Multiple Records--------" );
      List<Student> students = studentJDBCTemplate.listStudents();
      for (Student record : students) {
         System.out.print("ID : " + record.getId() );
         System.out.print(", Name : " + record.getName() );
         System.out.println(", Age : " + record.getAge());
      }
      System.out.println("----Updating Record with ID = 2 -----" );
      studentJDBCTemplate.update(2, 20);
      System.out.println("----Listing Record with ID = 2 -----" );
      Student student = studentJDBCTemplate.getStudent(2);
      System.out.print("ID : " + student.getId() );
      System.out.print(", Name : " + student.getName() );
      System.out.println(", Age : " + student.getAge());
   }
}
<?xml version="1.0" encoding="UTF-8"?>
<beans xmlns="http://www.springframework.org/schema/beans"
    xmlns:xsi="http://www.w3.org/2001/XMLSchema-instance"
    xsi:schemaLocation="http://www.springframework.org/schema/beans
    http://www.springframework.org/schema/beans/spring-beans-3.0.xsd ">

   <!-- Initialization for data source -->
   <bean id="dataSource"
      class="org.springframework.jdbc.datasource.DriverManagerDataSource">
      <property name="driverClassName" value="com.mysql.jdbc.Driver"/>
      <property name="url" value="jdbc:mysql://localhost:3306/TEST"/>
      <property name="username" value="root"/>
      <property name="password" value="password"/>
   </bean>

   <!-- Definition for studentJDBCTemplate bean -->
   <bean id="studentJDBCTemplate"
      class="com.tutorialspoint.StudentJDBCTemplate">
      <property name="dataSource"  ref="dataSource" />
   </bean>

</beans>
输出
------Records Creation--------
Created Record Name = Zara Age = 11
Created Record Name = Nuha Age = 2
Created Record Name = Ayan Age = 15
------Listing Multiple Records--------
ID : 1, Name : Zara, Age : 11
ID : 2, Name : Nuha, Age : 2
ID : 3, Name : Ayan, Age : 15
----Updating Record with ID = 2 -----
Updated Record with ID = 2
----Listing Record with ID = 2 -----
ID : 2, Name : Nuha, Age : 20
9、Spring事务管理
9.1 相关概念
事务的概念可表述为四个关键属性ACID
-
原子性:事务应该当作一个单独单元的操作,这意味着整个序列操作要么是成功,要么是失败的。
-
一致性:这表示数据库的引用完整性的一致性,表中唯一的主键等。
-
隔离性:可能同时处理很多有相同的数据集的事务,每个事务应该与其他事务隔离,以防止数据损坏。
-
持久性:一个事务一旦完成全部操作后,这个事务的结果必须是永久性的,不能因系统故障而从数据库中删除。
SQL发布到数据库中的简单视图
-
使用 begin transaction 命令开始事务。
-
使用 SQL 查询语句执行各种删除、更新或插入操作。
-
如果所有的操作都成功,则执行提交操作,否则回滚所有操作。
局部事务VS全局事务
1.局部事务:
-
特定于一个单一的事务资源,如一个 JDBC 连接。
-
在一个集中的计算环境中是有用,该计算环境中应用程序组件和资源位于一个单位点。
-
相比于全局事务更加容易实现。
2.全局事务
-
可以跨多个事务资源事务,如在一个分布式系统中的事务。
-
只涉及到一个运行在一个单一机器中的本地数据管理器。
-
相比于局部事务更加困难。
编程式事务管理VS声明式事务管理
1.编程式
这意味着你在编程的帮助下有管理事务,极大的灵活性,但却很难维护。
2.声明式
这意味着你从业务代码中分离事务管理,仅仅使用注释或 XML 配置来管理事务。
Spring事务抽象
//Spring 事务抽象的关键
public interface PlatformTransactionManager {
	//根据指定的传播行为,该方法返回当前活动事务或创建一个新的事务。
   TransactionStatus getTransaction(TransactionDefinition definition);
   throws TransactionException;
	//该方法提交给定的事务和关于它的状态
   void commit(TransactionStatus status) throws TransactionException;
	//该方法执行一个给定事务的回滚
   void rollback(TransactionStatus status) throws TransactionException;
}
//Spring 中事务支持的核心接口
public interface TransactionDefinition {
	//该方法返回传播行为。Spring 提供了与 EJB CMT 类似的所有的事务传播选项。
   int getPropagationBehavior();
	//该方法返回该事务独立于其他事务的工作的程度。
   int getIsolationLevel();
	//该方法返回该事务的名称
   String getName();
	//该方法返回以秒为单位的时间间隔,事务必须在该时间间隔内完成。
   int getTimeout();
   //该方法返回该事务是否是只读的
   boolean isReadOnly();
}
传播类型的可能值:
| 序号 | 传播 \& 描述 |
|---|---|
| 1 | TransactionDefinition.PROPAGATION_MANDATORY |
| 支持当前事务;如果不存在当前事务,则抛出一个异常。 | |
| 2 | TransactionDefinition.PROPAGATION_NESTED |
| 如果存在当前事务,则在一个嵌套的事务中执行。 | |
| 3 | TransactionDefinition.PROPAGATION_NEVER |
| 不支持当前事务;如果存在当前事务,则抛出一个异常。 | |
| 4 | TransactionDefinition.PROPAGATION_NOT_SUPPORTED |
| 不支持当前事务;而总是执行非事务性。 | |
| 5 | TransactionDefinition.PROPAGATION_REQUIRED |
| 支持当前事务;如果不存在事务,则创建一个新的事务。 | |
| 6 | TransactionDefinition.PROPAGATION_REQUIRES_NEW |
| 创建一个新事务,如果存在一个事务,则把当前事务挂起。 | |
| 7 | TransactionDefinition.PROPAGATION_SUPPORTS |
| 支持当前事务;如果不存在,则执行非事务性。 | |
| 8 | TransactionDefinition.TIMEOUT_DEFAULT |
| 使用默认超时的底层事务系统,或者如果不支持超时则没有。 |
隔离级别的可能值:
| 序号 | 隔离 \& 描述 |
|---|---|
| 1 | TransactionDefinition.ISOLATION_DEFAULT |
| 这是默认的隔离级别。 | |
| 2 | TransactionDefinition.ISOLATION_READ_COMMITTED |
| 表明能够阻止误读;可以发生不可重复读和虚读。 | |
| 3 | TransactionDefinition.ISOLATION_READ_UNCOMMITTED |
| 表明可以发生误读、不可重复读和虚读。 | |
| 4 | TransactionDefinition.ISOLATION_REPEATABLE_READ |
| 表明能够阻止误读和不可重复读;可以发生虚读。 | |
| 5 | TransactionDefinition.ISOLATION_SERIALIZABLE |
| 表明能够阻止误读、不可重复读和虚读。 |
//TransactionStatus 接口为事务代码提供了一个简单的方法来控制事务的执行和查询事务状态
public interface TransactionStatus extends SavepointManager {
//在当前事务时新的情况下,该方法返回 true
   boolean isNewTransaction();
//该方法返回该事务内部是否有一个保存点,也就是说,基于一个保存点已经创建了嵌套事务
   boolean hasSavepoint();
//该方法设置该事务为 rollback-only 标记。
   void setRollbackOnly();
//该方法返回该事务是否已标记为 rollback-only。
   boolean isRollbackOnly();
//该方法返回该事务是否完成,也就是说,它是否已经提交或回滚。
   boolean isCompleted();
}
9.2 编程式事务管理
至少要有两个数据库表,在事务的帮助下我们可以执行多种 CRUD 操作。
CREATE TABLE Student(
   ID   INT NOT NULL AUTO_INCREMENT,
   NAME VARCHAR(20) NOT NULL,
   AGE  INT NOT NULL,
   PRIMARY KEY (ID)
);
Marks用来存储基于年份的学生的标记。这里 SID 是 Student 表的外键。
CREATE TABLE Marks(
   SID INT NOT NULL,
   MARKS  INT NOT NULL,
   YEAR   INT NOT NULL
);
使用PlatformTransactionManager 来实现编程式方法从而实现事务
1.创建TransactionDefinition
2.调用getTransaction() 方法来开始你的事务,返回一个实例
3.TransactionStatus 对象帮助追踪当前的事务状态,并且最终,如果一切运行顺利,你可以使用 PlatformTransactionManager 的 commit() 方法来提交这个事务,否则的话,你可以使用 rollback() 方法来回滚整个操作。
package com.tutorialspoint;
import java.util.List;
import javax.sql.DataSource;
public interface StudentDAO {
   /**
    * This is the method to be used to initialize
    * database resources ie. connection.
    */
   public void setDataSource(DataSource ds);
   /**
    * This is the method to be used to create
    * a record in the Student and Marks tables.
    */
   public void create(String name, Integer age, Integer marks, Integer year);
   /**
    * This is the method to be used to list down
    * all the records from the Student and Marks tables.
    */
   public List<StudentMarks> listStudents();
}
package com.tutorialspoint;
public class StudentMarks {
   private Integer age;
   private String name;
   private Integer id;
   private Integer marks;
   private Integer year;
   private Integer sid;
   public void setAge(Integer age) {
      this.age = age;
   }
   public Integer getAge() {
      return age;
   }
   public void setName(String name) {
      this.name = name;
   }
   public String getName() {
      return name;
   }
   public void setId(Integer id) {
      this.id = id;
   }
   public Integer getId() {
      return id;
   }
   public void setMarks(Integer marks) {
      this.marks = marks;
   }
   public Integer getMarks() {
      return marks;
   }
   public void setYear(Integer year) {
      this.year = year;
   }
   public Integer getYear() {
      return year;
   }
   public void setSid(Integer sid) {
      this.sid = sid;
   }
   public Integer getSid() {
      return sid;
   }
}
package com.tutorialspoint;
import java.sql.ResultSet;
import java.sql.SQLException;
import org.springframework.jdbc.core.RowMapper;
public class StudentMarksMapper implements RowMapper<StudentMarks> {
   public StudentMarks mapRow(ResultSet rs, int rowNum) throws SQLException {
      StudentMarks studentMarks = new StudentMarks();
      studentMarks.setId(rs.getInt("id"));
      studentMarks.setName(rs.getString("name"));
      studentMarks.setAge(rs.getInt("age"));
      studentMarks.setSid(rs.getInt("sid"));
      studentMarks.setMarks(rs.getInt("marks"));
      studentMarks.setYear(rs.getInt("year"));
      return studentMarks;
   }
}
package com.tutorialspoint;
import java.util.List;
import javax.sql.DataSource;
import org.springframework.dao.DataAccessException;
import org.springframework.jdbc.core.JdbcTemplate;
import org.springframework.transaction.PlatformTransactionManager;
import org.springframework.transaction.TransactionDefinition;
import org.springframework.transaction.TransactionStatus;
import org.springframework.transaction.support.DefaultTransactionDefinition;
public class StudentJDBCTemplate implements StudentDAO {
   private DataSource dataSource;
   private JdbcTemplate jdbcTemplateObject;
   private PlatformTransactionManager transactionManager;
   public void setDataSource(DataSource dataSource) {
      this.dataSource = dataSource;
      this.jdbcTemplateObject = new JdbcTemplate(dataSource);
   }
   public void setTransactionManager(
      PlatformTransactionManager transactionManager) {
      this.transactionManager = transactionManager;
   }
   public void create(String name, Integer age, Integer marks, Integer year){
      TransactionDefinition def = new DefaultTransactionDefinition();
      TransactionStatus status = transactionManager.getTransaction(def);
      try {
         String SQL1 = "insert into Student (name, age) values (?, ?)";
         jdbcTemplateObject.update( SQL1, name, age);
         // Get the latest student id to be used in Marks table
         String SQL2 = "select max(id) from Student";
         int sid = jdbcTemplateObject.queryForInt( SQL2 );
         String SQL3 = "insert into Marks(sid, marks, year) " +
                       "values (?, ?, ?)";
         jdbcTemplateObject.update( SQL3, sid, marks, year);
         System.out.println("Created Name = " + name + ", Age = " + age);
         transactionManager.commit(status);
      } catch (DataAccessException e) {
         System.out.println("Error in creating record, rolling back");
         transactionManager.rollback(status);
         throw e;
      }
      return;
   }
   public List<StudentMarks> listStudents() {
      String SQL = "select * from Student, Marks where Student.id=Marks.sid";
      List <StudentMarks> studentMarks = jdbcTemplateObject.query(SQL,
                                         new StudentMarksMapper());
      return studentMarks;
   }
}
package com.tutorialspoint;
import java.util.List;
import org.springframework.context.ApplicationContext;
import org.springframework.context.support.ClassPathXmlApplicationContext;
import com.tutorialspoint.StudentJDBCTemplate;
public class MainApp {
   public static void main(String[] args) {
      ApplicationContext context =
             new ClassPathXmlApplicationContext("Beans.xml");
      StudentJDBCTemplate studentJDBCTemplate =
      (StudentJDBCTemplate)context.getBean("studentJDBCTemplate");
      System.out.println("------Records creation--------" );
      studentJDBCTemplate.create("Zara", 11, 99, 2010);
      studentJDBCTemplate.create("Nuha", 20, 97, 2010);
      studentJDBCTemplate.create("Ayan", 25, 100, 2011);
      System.out.println("------Listing all the records--------" );
      List<StudentMarks> studentMarks = studentJDBCTemplate.listStudents();
      for (StudentMarks record : studentMarks) {
         System.out.print("ID : " + record.getId() );
         System.out.print(", Name : " + record.getName() );
         System.out.print(", Marks : " + record.getMarks());
         System.out.print(", Year : " + record.getYear());
         System.out.println(", Age : " + record.getAge());
      }
   }
}
<?xml version="1.0" encoding="UTF-8"?>
<beans xmlns="http://www.springframework.org/schema/beans"
    xmlns:xsi="http://www.w3.org/2001/XMLSchema-instance"
    xsi:schemaLocation="http://www.springframework.org/schema/beans
    http://www.springframework.org/schema/beans/spring-beans-3.0.xsd ">

   <!-- Initialization for data source -->
   <bean id="dataSource"
      class="org.springframework.jdbc.datasource.DriverManagerDataSource">
      <property name="driverClassName" value="com.mysql.jdbc.Driver"/>
      <property name="url" value="jdbc:mysql://localhost:3306/TEST"/>
      <property name="username" value="root"/>
      <property name="password" value="password"/>
   </bean>

   <!-- Initialization for TransactionManager事务管理 -->
   <bean id="transactionManager"
      class="org.springframework.jdbc.datasource.DataSourceTransactionManager">
      <property name="dataSource"  ref="dataSource" />
   </bean>

   <!-- Definition for studentJDBCTemplate bean -->
   <bean id="studentJDBCTemplate"
      class="com.tutorialspoint.StudentJDBCTemplate">
      <property name="dataSource"  ref="dataSource" />
      <property name="transactionManager"  ref="transactionManager" />
   </bean>

</beans>
------Records creation--------
Created Name = Zara, Age = 11
Created Name = Nuha, Age = 20
Created Name = Ayan, Age = 25
------Listing all the records--------
ID : 1, Name : Zara, Marks : 99, Year : 2010, Age : 11
ID : 2, Name : Nuha, Marks : 97, Year : 2010, Age : 20
ID : 3, Name : Ayan, Marks : 100, Year : 2011, Age : 25
10、Spring Web MVC框架
10.1 基本概念
MVC框架
MVC 框架提供了模型-视图-控制的体系结构和可以用来开发灵活、松散耦合的 web 应用程序的组件。MVC 模式导致了应用程序的不同方面(输入逻辑、业务逻辑和 UI 逻辑)的分离,同时提供了在这些元素之间的松散耦合。
-
模型(Model)封装了应用程序数据,并且通常它们由 POJO 组成。
-
视图(View)主要用于呈现模型数据,并且通常它生成客户端的浏览器可以解释的 HTML 输出。
-
控制器(Controller)主要用于处理用户请求,并且构建合适的模型并将其传递到视图呈现。
Spring Web 模型-视图-控制(MVC)框架是围绕 DispatcherServlet 设计的
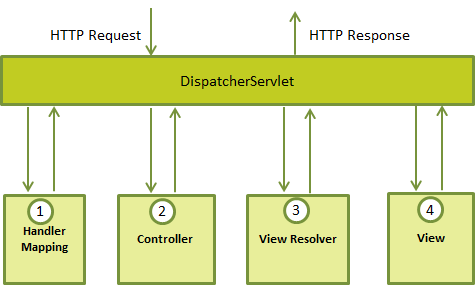
HandlerMapping、Controller 和 ViewResolver 是 WebApplicationContext 的一部分,而 WebApplicationContext 是带有一些对 web 应用程序必要的额外特性的 ApplicationContext 的扩展。
DispatcherServlet 传入 HTTP 请求的事件序列如下
- 收到一个 HTTP 请求后,DispatcherServlet 根据 HandlerMapping 来选择并且调用适当的控制器。
- 控制器接受请求,并基于使用的 GET 或 POST 方法来调用适当的 service 方法。Service 方法将设置基于定义的业务逻辑的模型数据,并返回视图名称到 DispatcherServlet 中。
- DispatcherServlet 会从 ViewResolver 获取帮助,为请求检取定义视图。
- 一旦确定视图,DispatcherServlet 将把模型数据传递给视图,最后呈现在浏览器中。
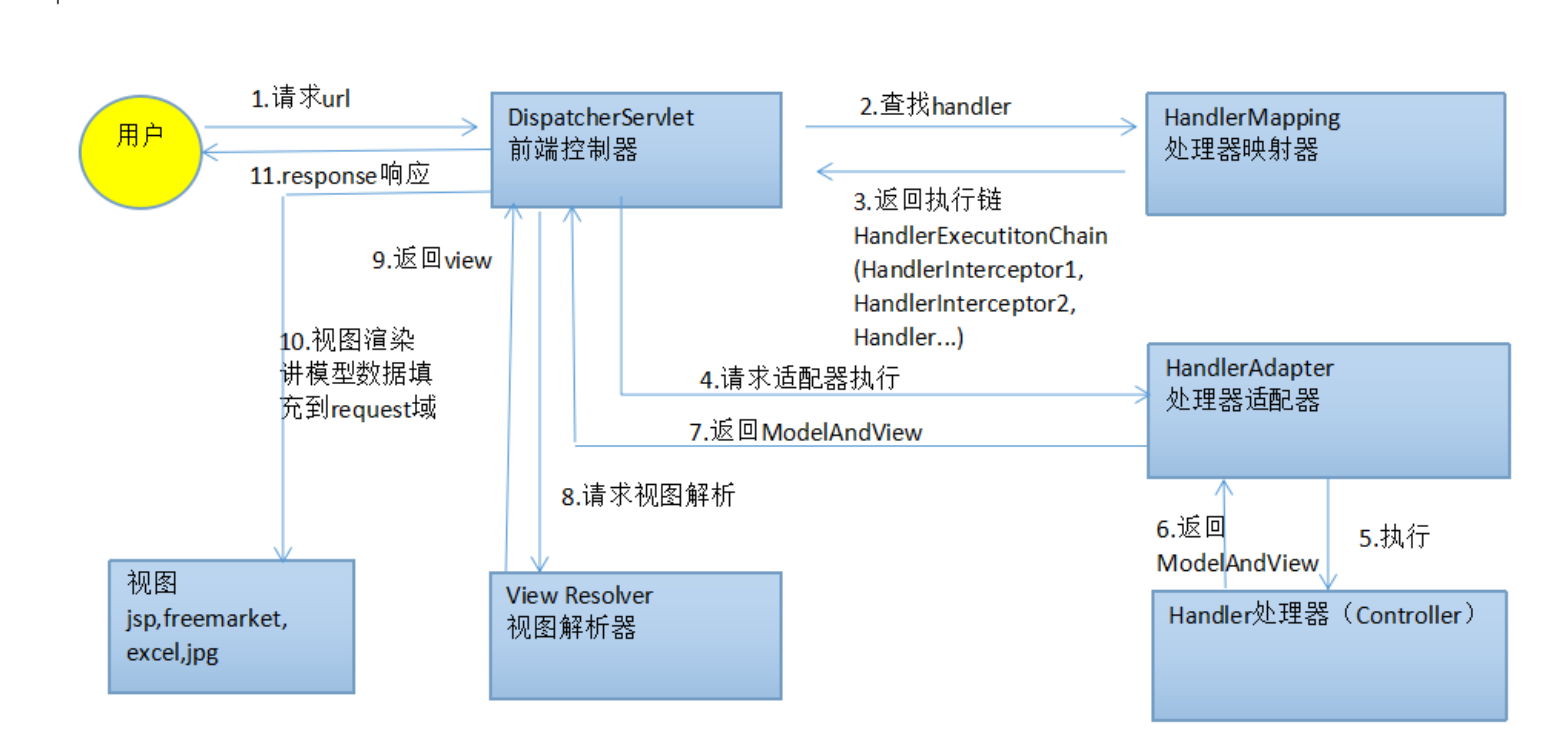
需求的配置
映射你想让 DispatcherServlet 处理的请求,通过使用在 web.xml 文件中的一个 URL 映射。
web.xml 文件将被保留在你的应用程序的 WebContent/WEB-INF 目录下。
例子,
<web-app id="WebApp_ID" version="2.4"
    xmlns="http://java.sun.com/xml/ns/j2ee"
    xmlns:xsi="http://www.w3.org/2001/XMLSchema-instance"
    xsi:schemaLocation="http://java.sun.com/xml/ns/j2ee
    http://java.sun.com/xml/ns/j2ee/web-app_2_4.xsd">
    <display-name>Spring MVC Application</display-name>
   <servlet>
      <servlet-name>HelloWeb</servlet-name>
      <servlet-class>
         org.springframework.web.servlet.DispatcherServlet
      </servlet-class>
      <load-on-startup>1</load-on-startup>
   </servlet>
	<!-- 映射到HelloWeb.jsp 这个文件-->
   <servlet-mapping>
      <servlet-name>HelloWeb</servlet-name>
      <url-pattern>*.jsp</url-pattern>
   </servlet-mapping>
</web-app>
11、Spring JPA
11.1 JPA介绍
Jpa (Java Persistence API) 是 Sun 官方提出的 Java 持久化规范。它为 Java 开发人员提供了一种对象/关联映射工具来管理 Java 应用中的关系数据。它的出现主要是为了简化现有的持久化开发工作和整合 ORM 技术(Object Relational Mapping,对象关系映射),结束现在 Hibernate,TopLink,JDO 等 ORM 框架各自为营的局面。
值得注意的是,Jpa是在充分吸收了现有 Hibernate,TopLink,JDO 等 ORM 框架的基础上发展而来的,具有易于使用,伸缩性强等优点。从目前的开发社区的反应上看,Jpa 受到了极大的支持和赞扬,其中就包括了 Spring 与 EJB3. 0的开发团队。
Spring Boot Jpa 是 Spring 基于 ORM 框架、Jpa 规范的基础上封装的一套 Jpa 应用框架,可使开发者用极简的代码即可实现对数据的访问和操作。它提供了包括增删改查等在内的常用功能,且易于扩展!学习并使用 Spring Data Jpa 可以极大提高开发效率!Spring Boot Jpa 让我们解脱了 DAO 层的操作,基本上所有 CRUD 都可以依赖于它来实现
欢迎关注我的微信公众号
互联网矿工