1、Spring子工程介绍
1.1 SpringBoot
Spring Boot让基于Spring的应用更加容易创建。
1.2 Spring Security
Spring Security是一个功能强大而且高度可定制的身份验证和访问控制框架。它是基于Spring应用的实际安全标准。
Spring Security是一个专注于Java应用的身份验证和授权的框架。像其他的Spring子工程一样,Spring Security的真正强大之处在于它可以轻松扩展以满足自定义要求。
2、Spring注解
2.1 概述
- @Component
- @Service
- @Scope
- @Repository
- @Controller
- @RestController
- @RequestMapping
- @PathVariable
- @ResponseBody
- @ComponentScan
2.2 声明Bean的注解
如何吸引Spring容器的注意而“有幸”成为Spring 容器管理的Bean呢? 在Spring Boot中就依靠注解,Spring提供了多个注解来声明Bean为Spring容器管理的Bean,注解不同代表的含义不同,但是对Spring容器来说都是Spring管理的Bean
-
@Component 没有明确角色的组件
-
@Service 在业务逻辑层(Service层)使用
Bean通过注解@Service声明为一个Spring容器管理的Bean,Spring容器会扫描classpath路径下的所有类,找到带有@Service注解的Impl类,并根据Spring注解对其进行初始化和增强
-
@Repository 在数据访问层(dao层)使用
-
@Controller 用于标注控制层组件
-
@RestController
2.3 注册bean的方法
类:@configuration
方法:@bean
- 定义配置类
@Configuration注解类,@bean注解方法,等价于xml中配置beans
package SpringStudy;
import org.springframework.context.annotation.Bean;
import org.springframework.context.annotation.Configuration;
import SpringStudy.Model.Counter;
import SpringStudy.Model.Piano;

@Configuration
public class SpringConfig {

	@Bean
	public Piano piano(){
		return new Piano();
	}
	@Bean(name = "counter1") //name即xml中配置的id
	public Counter counter(){
		return  new Counter(12,"Shake it Off",piano());
	}
    @Bean(name = "counter2") //name即xml中配置的id
	public Counter counter(){
		return  new Counter(20,"Shake it Off",piano());
	}
}
- 基础类代码
package SpringStudy.Model;
public class Counter {
	public  Counter() {
	}
	public  Counter(double multiplier, String song,Instrument instrument) {
		this.multiplier = multiplier;
		this.song = song;
		this.instrument=instrument;
	}
	private double multiplier;
	private String song;
	@Resource
	private Instrument instrument;
	public double getMultiplier() {
		return multiplier;
	}
	public void setMultiplier(double multiplier) {
		this.multiplier = multiplier;
	}
	public String getSong() {
		return song;
	}
	public void setSong(String song) {
		this.song = song;
	}
	public Instrument getInstrument() {
		return instrument;
	}
	public void setInstrument(Instrument instrument) {
		this.instrument = instrument;
	}
}
package SpringStudy.Model;
public class Piano {
	private String name="Piano";
	private String sound;
	public String getName() {
		return name;
	}
	public void setName(String name) {
		this.name = name;
	}
	public String getSound() {
		return sound;
	}
	public void setSound(String sound) {
		this.sound = sound;
	}
}
- 调用
package webMyBatis;

import org.springframework.context.ApplicationContext;
import org.springframework.context.annotation.AnnotationConfigApplicationContext;
import SpringStudy.Model.Counter;

public class SpringTest {
	public static void main(String[] args) {
		//ApplicationContext ctx = new ClassPathXmlApplicationContext("spring/bean.xml");// 读取bean.xml中的内容
		ApplicationContext annotationContext = new AnnotationConfigApplicationContext("SpringStudy");
		Counter c = annotationContext.getBean("counter1", Counter.class);// 创建bean的引用对象counter1
		System.out.println(c.getMultiplier());
		System.out.println(c.isEquals());
		System.out.println(c.getSong());
	        System.out.println(c.getInstrument().getName());
	}
}
2.4 自动配置dataSource
以一个测试类为例
@RunWith(SpringRunner.class)
//自动配置dataSource不然会出现运行错误
@EnableAutoConfiguration(exclude={DataSourceAutoConfiguration.class})
@SpringBootTest
public class RedisApplicationTest {
    @Test
    public void contextLoads() {
        System.out.println("hello web");
    }
}
2.5 @SpringBootApplication
等同于@Configuration, @EnableAutoConfiguration and @ComponentScan,同时使用。
可以在后面定义一些参数,如
//自动配置dataSource
@SpringBootApplication(exclude={DataSourceAutoConfiguration.class})
2.6 @Autowired
2.6.1 Setter方法中的@Autowired
@Autowired 注释可以在 setter 方法中被用于自动连接 bean
//TextEditor.java
package com.tutorialspoint;
import org.springframework.beans.factory.annotation.Autowired;
public class TextEditor {
   private SpellChecker spellChecker;
    //自动连接bean   SpellChecker
   @Autowired
   public void setSpellChecker( SpellChecker spellChecker ){
      this.spellChecker = spellChecker;
   }
   public SpellChecker getSpellChecker( ) {
      return spellChecker;
   }
   public void spellCheck() {
      spellChecker.checkSpelling();
   }
}
//SpellChecker.java
package com.tutorialspoint;
public class SpellChecker {
   public SpellChecker(){
      System.out.println("Inside SpellChecker constructor." );
   }
   public void checkSpelling(){
      System.out.println("Inside checkSpelling." );
   }
}
// MainApp.java
package com.tutorialspoint;
import org.springframework.context.ApplicationContext;
import org.springframework.context.support.ClassPathXmlApplicationContext;
public class MainApp {
   public static void main(String[] args) {
      ApplicationContext context = new ClassPathXmlApplicationContext("Beans.xml");
      TextEditor te = (TextEditor) context.getBean("textEditor");
      te.spellCheck();
   }
}
<!--Bean.xml-->

<?xml version="1.0" encoding="UTF-8"?>

<beans xmlns="http://www.springframework.org/schema/beans"
    xmlns:xsi="http://www.w3.org/2001/XMLSchema-instance"
    xmlns:context="http://www.springframework.org/schema/context"
    xsi:schemaLocation="http://www.springframework.org/schema/beans
    http://www.springframework.org/schema/beans/spring-beans-3.0.xsd
    http://www.springframework.org/schema/context
    http://www.springframework.org/schema/context/spring-context-3.0.xsd">

   <context:annotation-config/>

   <!-- Definition for textEditor bean without constructor-arg  -->
   <bean id="textEditor" class="com.tutorialspoint.TextEditor">
   </bean>

   <!-- Definition for spellChecker bean -->
   <bean id="spellChecker" class="com.tutorialspoint.SpellChecker">
   </bean>

</beans>
2.6.2 属性中的@Autowired
在属性中使用@Autowired来免除setter方法
//TextEditor.java
package com.tutorialspoint;
import org.springframework.beans.factory.annotation.Autowired;
public class TextEditor {
    //直接给spellChecker一个bean
   @Autowired
   private SpellChecker spellChecker;
   public TextEditor() {
      System.out.println("Inside TextEditor constructor." );
   }
   public SpellChecker getSpellChecker( ){
      return spellChecker;
   }
   public void spellCheck(){
      spellChecker.checkSpelling();
   }
}
2.6.3 构造函数中的@Autowired
可以在构造函数中使用 @Autowired。一个构造函数 @Autowired 说明当创建 bean 时,即使在 XML 文件中没有使用 元素配置 bean ,构造函数也会被自动连接。
// TextEditor.java
package com.tutorialspoint;
import org.springframework.beans.factory.annotation.Autowired;
public class TextEditor {
   private SpellChecker spellChecker;
   @Autowired
   public TextEditor(SpellChecker spellChecker){
      System.out.println("Inside TextEditor constructor." );
      this.spellChecker = spellChecker;
   }
   public void spellCheck(){
      spellChecker.checkSpelling();
   }
}
2.6.4 关于@Autowired的问题
-
如何处理多个符合的Bean
@Autowired默认是按照byType进行注入的,但是当byType方式找到了多个符合的bean,又是怎么处理的?Autowired默认先按byType,如果发现找到多个bean,则又按照byName方式比对。
2.7 @SpringBootApplication
2.8 @RestController
声明一个REST规则的controller。
2.9 @ComponentScan
对Application类添加@ComponentScan来指定扫描的包,但是一旦指定后,就不会再默认扫描Application类下的包
补充:Bean要放在Application类目录之下,不然无法扫描到,进而无法依赖注入
2.10 @Scheduled
Springboot可以通过@EnableScheduling(写在Application类前面),来使能Bean对象(可通过@Component实现)的周期性调度任务@Scheduled。
@Component("taskJob")
public class Taskjobs {
    private final static Logger logger = LoggerFactory.getLogger(Taskjobs.class);
    @Scheduled(cron="10/5 * * * * ?")
    public void sendKafkaMsg(){
        try{
            logger.info("Starting send msg");
        }catch (Exception e){
            logger.error("",e);
        }
    }
}
https://docs.spring.io/spring-data/jpa/docs/current/reference/html/)
2.11 http参数获取
@RequestBody从http的body中获取数据;@RequestParam从http的参数中获取数据;@PathVariable获取路径中的参数
2.11.1 @RequestBody实例
-
数据对象
  // Vehicle
  public class Vehicle implements Serializable {
      private long id;
      private RuntimeData rtData;
      @Override
      public String toString(){
          return "Vehicle{" +
                  "id=" + id + ","+
                  "data={" +
                  "speed="+rtData.speed + "," +
                  "ecuMaxTemp="+rtData.ecuMaxTemp+
                  "}"+
                  "}";
      }
  }
public class RuntimeData implements Serializable { /** * car speed */ protected int speed; /** * car temperature */ protected int ecuMaxTemp; } -
Controller
@RequestMapping(value = apiPrefix+"/sendData", method = RequestMethod.POST) public Object sendData(@RequestBody Vehicle vehicle) { //dosomething //return vehicle string return vehicle.toString(); } -
postman在body中发送json数据
body中的数据名称和controller中的Vehicle对象的属性(数据名称)相同。
{
	"id":"1","rtData":{"speed":"100","ecuMaxTemp":"50"}
}
如果json中缺少某一个数据,仍然能够运行,缺少的数据为默认值。
2.11.2 @RequesParam实例
@RequestMapping("/doLogin")
    public User doLogin(@RequestParam(value="name") String username, @RequestParam(value="pswd") String password) {
        logger.info("name: " + username);
        logger.info("psed: " + password);
        User user = new User();
        user.setPswd(password);
        user.setName(username);

        return user;
    }
2.11.3 @PathVariable
@RequestMapping(value="/addUser4/{username}/{password}",method=RequestMethod.GET)
public String addUser4(@PathVariable String username,@PathVariable String password) {
        System.out.println("username is:"+username);
        System.out.println("password is:"+password);
        return "demo/index";
}
2.12 @Configuration和@Bean
@Configuration用于启动容器,@Bean用于注册Bean对象。
2.12.1 @Configuration
@Configuration标注在类上,相当于把该类作为spring的xml配置文件中的<beans>,作用为:配置spring容器(应用上下文)
package com.test.spring.support.configuration;

@Configuration
public class TestConfiguration {
    public TestConfiguration(){
        System.out.println("spring容器启动初始化。。。");
    }
}
相当于如下,还没有配置具体的Bean对象
<?xml version="1.0" encoding="UTF-8"?>
<beans xmlns="http://www.springframework.org/schema/beans" xmlns:xsi="http://www.w3.org/2001/XMLSchema-instance"
    xmlns:context="http://www.springframework.org/schema/context" xmlns:jdbc="http://www.springframework.org/schema/jdbc"
    xmlns:jee="http://www.springframework.org/schema/jee" xmlns:tx="http://www.springframework.org/schema/tx"
    xmlns:util="http://www.springframework.org/schema/util" xmlns:task="http://www.springframework.org/schema/task" xsi:schemaLocation="
        http://www.springframework.org/schema/beans http://www.springframework.org/schema/beans/spring-beans-4.0.xsd
        http://www.springframework.org/schema/context http://www.springframework.org/schema/context/spring-context-4.0.xsd
        http://www.springframework.org/schema/jdbc http://www.springframework.org/schema/jdbc/spring-jdbc-4.0.xsd
        http://www.springframework.org/schema/jee http://www.springframework.org/schema/jee/spring-jee-4.0.xsd
        http://www.springframework.org/schema/tx http://www.springframework.org/schema/tx/spring-tx-4.0.xsd
        http://www.springframework.org/schema/util http://www.springframework.org/schema/util/spring-util-4.0.xsd
        http://www.springframework.org/schema/task http://www.springframework.org/schema/task/spring-task-4.0.xsd" default-lazy-init="false">

</beans>
2.12.2 @Bean
@Bean标注在方法上(返回某个实例的方法),等价于spring的xml配置文件中的<bean>,作用为:注册bean对象
@Configuration
public class TestConfiguration {
        public TestConfiguration(){
            System.out.println("spring容器启动初始化。。。");
        }

    //@Bean注解注册bean,同时可以指定初始化和销毁方法
    //@Bean(name="testNean",initMethod="start",destroyMethod="cleanUp")
    @Bean
    @Scope("prototype")  //定义为原型作用域,见下方作用域解释
    public TestBean testBean() {
        return new TestBean();
    }
}
Bean对象作用域
1.singelton(单例),则Spring IOC 容易只存在一个实例;
2.prototype(原型),每一次请求(将其注入到另一个bean中,或者以程序的方式调用容器的getBean()方法)都会产生一个新的bean实例,相当与一个new的操作。
3、使用Spring JPA
3.1 核心概念
Spring Data库的核心接口是Repository。它使用domain类去管理,domain类中的id类型作为类型参数。这个接口主要作为一个标记接口,依靠具体的类型运作并帮助您发现接口,CrudRepository 提供丰富的CRUD功能去管理实体类。
-
例1 CrudRepository接口
public interface CrudRepository<T, ID extends Serializable> extends Repository<T, ID> {
 <S extends T> S save(S entity);    //保存给定的实体。
 T findOne(ID primaryKey);          //返回给定id的实体。
 Iterable<T> findAll();             //返回所有实体。
 Long count();                      //返回实体的数量。
 void delete(T entity);             //删除给定的实体。
 boolean exists(ID primaryKey);     //表明一个指定id的实体是否存在。
}
Spring还提供持久性特定于技术的抽象如:
JpaRepository或MongoRepository. 这些接口继承于CrudRepository,实现了特定的一些功能CrudRepository有一个PagingAndSortingRepository抽象,增加了额外的方法来简化对实体的分页访问: -
例2 PagingAndSortingRepository接口
public interface PagingAndSortingRepository<T, ID extends Serializable> extends CrudRepository<T, ID> {
  Iterable<T> findAll(Sort sort);
  Page<T> findAll(Pageable pageable);
}
进入
用户类别的第二页(每一页的条目是20),可以照下面这样来分页PagingAndSortingRepository<User, Long> repository = // … get access to a bean Page<User> users = repository.findAll(new PageRequest(1, 20));除了查询方法外,还有统计查询和删除查询。
-
例3 查询并统计
public interface UserRepository extends CrudRepository<User, Long> { Long countByLastname(String lastname); } -
例4 查询并删除
public interface UserRepository extends CrudRepository<User, Long> {
  Long deleteByLastname(String lastname);
  List<User> removeByLastname(String lastname);
}
3.2 查询方法
标准的CRUD功能存储库通常对底层数据存储查询。Spring Data把这些查询变成了四个步骤的过程:
1.声明一个接口继承Repository或其子类,输入实体类型和ID类型。
// 实体类型为Person,ID类型为Long
interface PersonRepository extends Repository<Person, Long> { … }
2.在接口里声明查询方法。
interface PersonRepository extends Repository<Person, Long> {
  List<Person> findByLastname(String lastname);
}
3.为这些接口创建代理实例,也可通过 JavaConfig :
import org.springframework.data.jpa.repository.config.EnableJpaRepositories;

@EnableJpaRepositories
class Config {}
本例中使用了JPA名称空间。如果您正在使用repository中的抽象为任何其他数据源,你需要改变这种适当的名称空间声明你的存储模块来与jpa支持,例如:mongodb。
注意,不用通过Java变量来配置包,默认情况下会根据注解的类来自动声明。定制的包扫描可以使用basePackage属性,特定的库可以使用@Enable来注解。
4.获得repository 实例注入并使用它。
class SomeClient {
  @Autowired
  private final PersonRepository repository;
  SomeClient(PersonRepository repository) {
      this.repository = repository;
  }
  public void doSomething() {
    List<Person> persons = repository.findByLastname("Matthews");
  }
}
3.3 定义repository接口
首先需要定义实体类的接口,接口必须继承repository并且输入实体类型和ID类型,如果需要用到CRUD方法,可以使用CrudRepository来替代Repository。
3.3.1 自定义接口
通常,您的存储库接口将会扩展Repository, CrudRepository或PagingAndSortingRepository。 另外,如果你不想继承Spring Data接口,还可以注释库接口@RepositoryDefinition。 扩展CrudRepository公开了一套完整的方法来操作您的实体。 如果你喜欢选择调用方法,简单地从CrudRepository中复制你想要的方法到你的repository。
例 有选择地公开CRUD方法
@NoRepositoryBean
interface MyBaseRepository<T, ID extends Serializable> extends Repository<T, ID> {
  Optional<T> findById(ID id);
  <S extends T> S save(S entity);
}
interface UserRepository extends MyBaseRepository<User, Long> {
  User findByEmailAddress(EmailAddress emailAddress);
}
第一步你定义了一个公共基础的接口提供了findById(…)和save(...)方法,这些方法将会引入到你选择的spring Data的实现类中,例如JPA:SimpleJpaRepository,因为他们匹配CrudRepository的方法签名,所以UserRepository将会具备save Users和根据ID查询的功能,当然也具备findByEmailAddress的功能。
注意,如果中间的repository接口添加了
@NoRepositoryBean注解,确认你所有的repository都添加了这个注解,这时候spring Data在运行时将不会创建实例。
3.3.2 Repository方法Null的处理
在Spring Data 2.0中,Repository的CRUD方法使用Java 8的Optional返回一个独立的合计实例,表明一个值可能缺失。此外,Spring Data还支持查询方法返回其他包装类:
com.google.common.base.Optionalscala.Optionio.vavr.control.Optionjavaslang.control.Option(deprecated as Javaslang is deprecated)
查询方法也可不返回任何包装类,缺失的查询结果将返回null。返回集合,可选集合,包装类和流的Repository方法将返回相应的空表示而不返回null。
可以使用Nullability注解。
3.3.3 使用Spring Data多模块来创建Repositories
使用唯一的Spring Data模块在应用中是非常简单,但有时候我们需要多的Spring Data模块,比如:需要定义个Repository去区分两种不同的持久化技术,如果在class path中发现多个Repository时,spring data会进行严格的配置限制,确保每个repository或者实体决定绑定那个Spring Data模块:
1、如果 repository 定义继承特殊的Repository,他是一个特殊的Spring Data模块
2、如果实体注解了一个特殊的声明,它是一个特殊的spring Data模块,spring Data模块接收第三方的声明(例如:JPA’s @Entity)或者提供来自 Spring Data MonggoDB/Spring Data Elasticsearch的 @Document 。
-
例1 自定义特殊的Repository
interface MyRepository extends JpaRepository<User, Long> { } @NoRepositoryBean interface MyBaseRepository<T, ID extends Serializable> extends JpaRepository<T, ID> { … } interface UserRepository extends MyBaseRepository<User, Long> { … }MyRepositoryandUserRepository继承于JpaRepository在这个层级中是对Spring Data JPA 模块的合法替代 -
例2 使用一般的接口定义Repository
interface AmbiguousRepository extends Repository<User, Long> { … } @NoRepositoryBean interface MyBaseRepository<T, ID extends Serializable> extends CrudRepository<T, ID> { … } interface AmbiguousUserRepository extends MyBaseRepository<User, Long> { … }AmbiguousRepository和AmbiguousUserRepository仅继承于Repository和CrudRepostory在他们的层级。当它们使用一个spring data模块的时候是完美的,但是如果使用多模块spring data 是,spirng 无法区分每个Repository的范围。 -
例3 使用实体类注解来定义Repository的使用范围
interface PersonRepository extends Repository<Person, Long> { … } @Entity public class Person { … } interface UserRepository extends Repository<User, Long> { … } @Document public class User { … }Person使用了@Entity注解PersonRepository引用了它,所以这个仓库清晰的使用了Sping Data JPA。UserRepository引用的User声明了@Document表面这个仓库将使用Spring Data MongoDB 模块。 -
例4 使用混合的注解来定义仓库
interface JpaPersonRepository extends Repository<Person, Long> {
 …
}

interface MongoDBPersonRepository extends Repository<Person, Long> {
 …
}

@Entity   // 可用于JPA
@Document  // 可用于Mongodb
public class Person {
  …
}
这个例子中实体类
Person···使用了两种注解,表明这个实体类既可以用于JpaPersonRepository也可以用于MongoDBPersonRepository ```,Spring Data不能确定仓库类型导致未定义的行为。通过Repository继承或者使用注解都是为了确定使用那个Spring Data模块。使用多个注解到同一个实体来达到多类型的持久化技术,Spring Data不在限制只能绑定到一个Repostitory中。
最后一种方法来区分不同的仓库类型,使用包路径来判断。不同的包路径下的仓库使用不同的仓库类型,通过在配置类
configuration中声明注解来实现,也可以通过xml配置来定义。 -
例5 通过注解来实现不同包路径,使用不同的仓库
@EnableJpaRepositories(basePackages = "com.acme.repositories.jpa")
@EnableMongoRepositories(basePackages = "com.acme.repositories.mongo")
interface Configuration { }
3.4 定义查询方法
repository 代理有两种方法去查询。一种是根据方法名或者自定义查询,可用的选项取决于实际的商店。然而,根据相应的策略来决定实际SQL的创建,让我们看看选择项吧。
3.4.1 查询查找策略
以下策略可供查询库基础设施来解决。您可以配置策略名称空间通过 query-lookup-strategy属性的XML配置或通过queryLookupStrategy启用的属性${store}库注释的Java配置。一些策略可能不支持特定的数据存储。
create试图构建一个能找到查询的查询方法名称。 通常的做法是把给定的一组注明前缀的方法名和解析的方法。USE_DECLARED_QUERY试图找到一个声明查询并将抛出一个异常情况。查询可以定义注释上。CREATE_IF_NOT_FOUND(默认)结合CREATE和USE_DECLARED_QUERY。 看起来一个声明查询第一,如果没有声明查询发现,它创建一个定制的基于名称的查询方法。这是默认查找策略,因此如果你不使用任何显式配置。 它允许快速查询定义的方法名,还custom-tuning这些查询通过引入需要查询。
3.4.2 创建查询
query builder机制内置为构建约束查询库的实体。 带前缀的机制findXXBy,readAXXBy,queryXXBy,countXXBy, getXXBy自动解析的其余部分。进一步引入子句可以包含表达式等Distinct设置不同的条件创建查询。 然而,第一个By作为分隔符来表示实际的标准的开始。 在一个非常基础的查询,可以定义条件And或者Or。
-
例1 根据方法名创建查询
public interface PersonRepository extends Repository<User, Long> {

  List<Person> findByEmailAddressAndLastname(EmailAddress emailAddress, String lastname);

  // Enables the distinct flag for the query
  List<Person> findDistinctPeopleByLastnameOrFirstname(String lastname, String firstname);
  List<Person> findPeopleDistinctByLastnameOrFirstname(String lastname, String firstname);

  // Enabling ignoring case for an individual property
  List<Person> findByLastnameIgnoreCase(String lastname);
  // Enabling ignoring case for all suitable properties
  List<Person> findByLastnameAndFirstnameAllIgnoreCase(String lastname, String firstname);

  // Enabling static ORDER BY for a query
  List<Person> findByLastnameOrderByFirstnameAsc(String lastname);
  List<Person> findByLastnameOrderByFirstnameDesc(String lastname);
}
实际结果的解析方法取决于你的持久性存储创建查询。-然而,也有一些一般要注意的事情。
- 遍历表达式通常结合运算符连接。您可以把表达式
And和Or,Between,LessThan(不超过) ,GreaterThan,Like等运算符,这些操作对不同的数据库可能有所不同,具体参考各参考文档 - 方法解析支持设置
IgnoreCase在属性上面(如,findByLastnameIgnoreCase(…)),或者支持查询所有属性忽略大小写(如,findByLastnameAndFirstnameAllIgnoreCase(…)), 忽略大小写支持所有的数据库,其它的查询参考相关文档 - 您可以应用静态排序通过附加一个
OrderBy基准进行排序,引用属性和方向提供了一个排序(asc或Desc)。 创建一个支持动态排序的查询方法,明白了特殊参数处理 。
3.4.3 属性表达式
属性表达式只能引用的直接财产管理的实体,如前面的示例所示。 在创建查询时你已经确保解析房地产管理的域类的一个属性。 然而,您还可以定义约束通过遍历嵌套属性。 假设一个Person有一个Address与一个Zipcode。 在这种情况下一个方法的名称
List<Person> findByAddressZipCode(ZipCode zipCode);
创建属性遍历x.address.zipCode。方法执行首先解释整个部分(AddressZipCode)作为财产和检查的域类属性的名称(小写形式)。 分割源在驼峰式大小写部分从右侧头部和尾巴,试图找到对应的属性,在我们的例子中,分割为AddressZip和Code。 分裂不匹配,该算法分割点移动到左(Address, Zipcode)然后继续,
在大多数情况下,这种算法有可能会出现错误,您可以使用来解决这种模糊性 _ 在方法名来手动定义遍历点。所以我们的方法名称最终将像这样:
List<Person> findByAddress_ZipCode(ZipCode zipCode);
如果你的属性名称包含下划线(如。 first_name 中下划线),建议使用驼峰的方式来避免。
3.4.4 特殊参数处理
处理参数查询只需方法参数定义为已经在上面的例子中。 除了基础查询将会认识到某些特定类型Pageable和Sort应用动态查询分页和排序
-
使用
Pageable,Slice和Sort来查询Page<User> findByLastname(String lastname, Pageable pageable); Slice<User> findByLastname(String lastname, Pageable pageable); List<User> findByLastname(String lastname, Sort sort); List<User> findByLastname(String lastname, Pageable pageable);
第一个方法允许在你的查询方法的静态定义查询中通过一个org.springframework.data.domain.Pageable实例来动态的添加分页。分页类知道元素的总数和可用页数。它通过基础库来触发一个统计查询计算所有的总数。由于这个查询可能对store消耗巨大,可以使用Slice来替代。Slice仅仅知道是否有下一个Slice可用,这对查询大数据已经足够了。
排序选项和分页的处理方式一样。如果你需要排序,简单的添加一个org.springframework.data.domain.Sort参数到你的方法即可。也正如你所见,简单的返回一个列表也是可以的,在这种情况下,生产的分页实例所需的附加元数据将不会被创建(这也意味着额外的计数查询可能需要但不一定被公布)。
要找到在你的查询中有多少页,你需要触发一个额外的计数查询。按照默认来说这个查询可以从你实际触发查询中衍生出来
3.4.5 限制查询结果
查询方法的结果可以通过关键字first或者top来限制,它们可以交替使用。在top/firest后添加数字来表示返回最大的结果数。如果没有数字,则默认假定1作为结果大小。
-
用
Top和First查询限制结果大小User findFirstByOrderByLastnameAsc(); User findTopByOrderByAgeDesc(); Page<User> queryFirst10ByLastname(String lastname, Pageable pageable); Slice<User> findTop3ByLastname(String lastname, Pageable pageable); List<User> findFirst10ByLastname(String lastname, Sort sort); List<User> findTop10ByLastname(String lastname, Pageable pageable);
限制表达式也支持Distinct关键字。对于限制查询的结果集定义到一个实例中包装这个结果到一个Optional中也是被支持的。
如果分页或者切片被应用到一个限制查询分页(计算多少页可用)则它也能应用于限制结果。
要注意结合通过Sort参数动态排序的限制结果容许表达查询的方法为“K”最小的,以及“K”最大的元素。
3.4.6 流查询结果
查询方法能对以JAVA 8的Stream为返回的结果进行逐步处理。而不是简单地包装查询结果在被用来执行流的流数据存储特定的方法。
-
以JAVA 8的Stream来进行查询的流处理结果
 @Query("select u from User u")

 Stream<User> findAllByCustomQueryAndStream();

 Stream<User> readAllByFirstnameNotNull();

 @Query("select u from User u")

 Stream<User> streamAllPaged(Pageable pageable);
一个数据流可能包裹底层数据存储特定资源,因此在使用后必须关闭。 你也可以使用close()方法或者JAVA 7 try-with-resources区块手动关闭数据流
3.4.7 异步查询结果
@Async
Future<User> findByFirstname(String firstname); //使用 java.util.concurrent.Future 作为返回类型

@Async
CompletableFuture<User> findOneByFirstname(String firstname);//使用 Java 8 java.util.concurrent.CompletableFuture 作为返回类型

@Async
ListenableFuture<User> findOneByLastname(String lastname);// 使用 org.springframework.util.concurrent.ListenableFuture 作为返回类型
3.5 创建repository实例
在这个部分,你创建实例和为repository接口定义的bean。这样做的一个方法是使用Spring的名称空间,这是与每个Spring Data模块,支持存储机制,虽然我们一般建议使用JAVA配置风格的配置。
3.5.1 配置
一个Java配置的类使用@Enable${store}Repositories注解来触发repository框架。
-
基于repository配置的注解示例
@Configuration
@EnableJpaRepositories("com.acme.repositories")
class ApplicationConfiguration {

  @Bean
  EntityManagerFactory entityManagerFactory() {
    // …
  }
}
该示例使用特定于JPA的注解,您可以根据实际使用的store模块做相应改变。这同样适用于
EntityManagerFactorybean的定义。请参阅有关store特定配置的章节。可以通过@Autowired来注入。
3.5.2 独立使用
还可以使用Spring容器之外的repository基础架构,例如CDI环境。你仍然需要在classpath中添加一些Spring库,但是通常来说你可以在代码中设置repositories。 提供repository支持的Spring Data模块提供了一个RepositoryFactory(持久化的技术特定),使用如下所示。
-
例1 repository工厂的独立使用
RepositoryFactorySupport factory = … // Instantiate factory here
UserRepository repository = factory.getRepository(UserRepository.class);
3.6 Spring Data repository的自定义实现
3.7 从聚合根处发布事件
3.8 Spring Data 的拓展
4、Spring Security
4.1 基本概念
4.1.1 Token
Token是访问资源的凭证,例如当调用Google API时,需要带上有效token(Google提供)来表明请求的合法性。
请求API时携带Token的方式包括:HTTP Header、URL参数或者Google提供的类库。
-
HTTP Header
GET /drive/v2/files HTTP/1.1 Authorization: Bearer <token> Host: www.googleapis.com/ -
URL参数
GET https://www.googleapis.com/drive/v2/files?token=<token> -
Python函数
from googleapiclient.discovery import build
drive = build('drive', 'v2', credentials=credentials)
上述用于调用API的Token细分为access token,有有效期限,如果过期需要重新获取。
第一次获取Token的流程:
1.向Google API注册一个应用,注册完毕后会拿到认证信息(credentials)包括ID和secret,不是所有的程序类型都有secret。
2.向Google请求access token,需要请求参数(上面申请到的secret)
3.如果用户授权完毕,Google返回access token和refresh token。
一旦access token过期,可以通过refresh token再次请求access token。
问题
- 如果
refesh token也过期了怎么办?这时就需要用户 重新登陆授权。 - 为什么要区分
refresh token和access token?如果合并成一个token然后把 过期时间 调整的 更长,并且每次 失效 之后用户 重新登陆授权 就好了?
4.1.2 单点登录
单点登录(SSO, Single sign-on)即公司内部的公用的用户体系,用户只要登陆之后,就能够 访问所有的系统,如人力资源、代码管理、日志监控、预算申请。
SSO是一类解决方案的统称,在具体实施方面,有两种方案可供选择:
- SAML(Security Assertion Markup Language) 2.0
- OAuth(Open Authorization) 2.0
4.1.3 认证和授权
- Authentication: 身份鉴别,简称 认证;
- Authorisation: 资源访问 授权。
认证 的作用在于 认可 你能够访问系统,用于 鉴别访问者 是否是 合法用户;而 授权 用于决定你有访问 哪些资源的权限。
把负责 认证的服务 称为 AuthorizationServer 或者 IdentityProvider,简称 IDP;把负责 提供资源(API 调用)的服务称为 ResourceServer 或者 ServiceProvider,以下简称 SP。
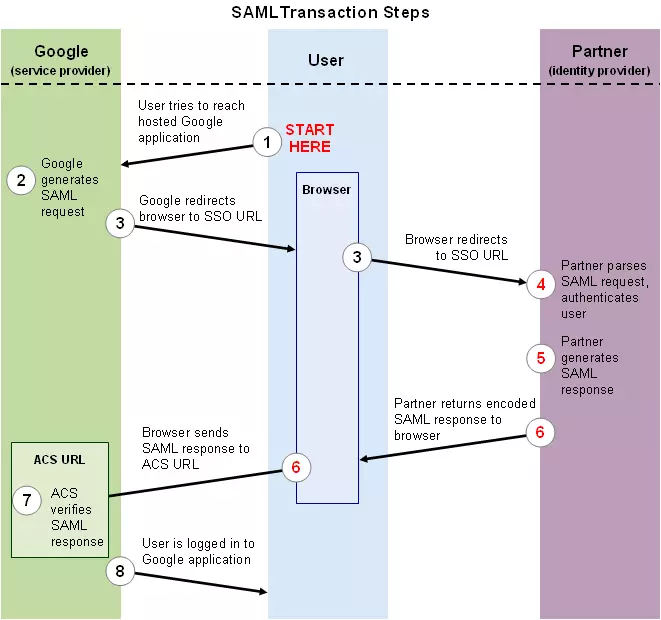
4.1.4 SAML 2.0
在SAML协议中,一旦用户身份被主网站(身份鉴别服务器,Identity Provider,IDP)认证过后,该用户再去访问其他在主站注册过的应用(服务提供者,Service Providers,SP)时,都可以直接登录,而不用再输入身份和口令。
4.1.5 OAuth 2.0
4.1.5.1 概念
OAuth 全称 Open Authorization 开放授权( OAuth is an open standard for authorization ),是一个安全相关的协议,它为桌面程序或者基于 B/S 的 web 应用提供了一种简单的,标准的方式去访问需要用户授权的 API 服务。即允许第三方网站在用户授权的前提下访问在用户在服务商那里存储的各种信息,而这种授权无需将用户提供的用户名和密码提供给该第三方网站。
OAuth 允许用户提供一个令牌给第三方网站,一个令牌对应一个特定的第三方网站,同时该令牌只能在特定的时间内访问特定的资源。从获取 token 到使用 token 访问接口。这其实是标准的 OAuth2.0 机制下访问 API 的流程。
4.1.5.2 OAuth特点
Ø 简单:不管是 OAUTH 服务提供者还是应用开发者,都很容易于理解与使用;
Ø 安全:没有涉及到用户密钥等信息,更安全更灵活;
Ø 开放:任何服务提供商都可以实现 OAUTH ,任何软件开发商都可以使用 OAUTH 。
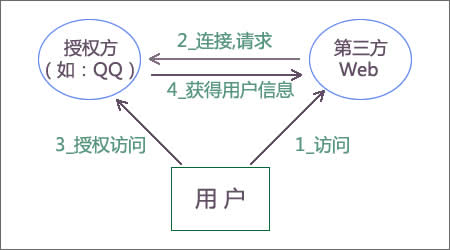
4.1.5.3 主要角色
1、 Service Provider 服务提供方(服务商)
用户使用服务的提供方,一般用来存消息、照片、视频、联系人、文件等 ( 比如 Twitter 、新浪微博等 ) 。
2、 Consumer 消费方(第三方)
通常是网站,该网站想要访问用户存储在服务商那里的信息。
3、 User 用户
服务商的用户 。
4.1.5.4 OAuth2.0认证过程
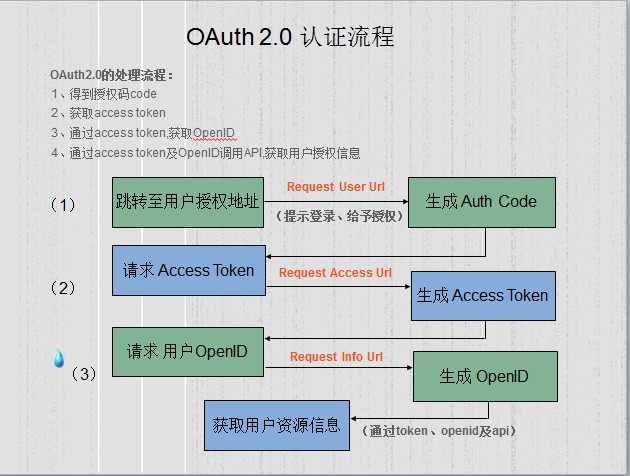
详细说明如下:
第一步:得到授权码 code
首先直接跳转至用户授权地址,即图示 Request User Url ,提示用户进行登录,并给予相关资源授权,得到唯一的 Auth code ,这里注意的是 code 只有 10 分钟的有效期,对于安全考虑,相对于 OAuth 1.0 省了一步获取临时的 Token ,并且有效期也进行了控制,比 1.0 认证简化了很多,并安全一些;
第二步:获取 access token
得到授权 code 后,就是请求 access token ,通过图示 Request access url ,生成得到数据 Token ;
第三步:通过 access token, 获取 OpenID
通过 Access Token 请求 OpenID , OpenID 是用户在此平台的唯一标识,通过图示 Request info url 请求,然后得到 OpenID ;
第四步:通过 access token 及 OpenID 调用 API, 获取用户授权信息
通过第二步得到的数据 Token 、第三步得到的 OpenID 及相关 API ,进行请求,获取用户授权资源信息。
补充:OAuth 关注的是 authorization( 授权 ) ;而 OpenID 侧重的是 authentication (认证)。
4.1.5.5 OAuth 2.0的授权方式
-
授权码模式(Authorization Code)
-
简化模式(implicit)
-
密码模式(Resource Owner Password Credentials)
-
客户端模式(Client Credentials)
主要用于API认证,和用户无关
4.1.6 SAML、OAuth、OpenID的比较
-
SAML
SAML包含了认证和授权
-
OAuth
只做授权——资源访问。
-
OpenID
认证
4.2 Spring Security
Spring Security支持Spring Security Kerberos、Spring Security OAuth、Spring Security SAML。
4.2.1 Spring Security介绍
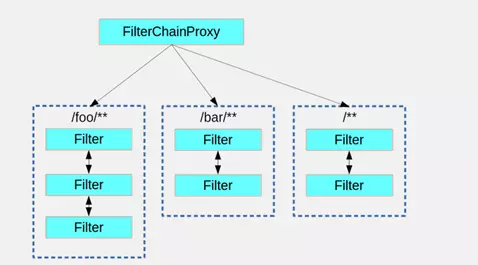
Java在正常servelet处理http的请求可能会经过很多的filter。Spring Security有一个FilterChainProxy的代理类,该类实现了servlet接口。
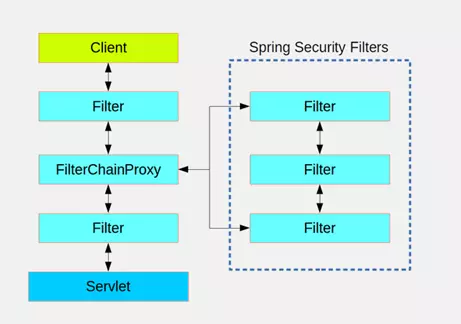
FilterChainProxy内部有一个List<SecurityFilterChain> filterChains,每个SecurityFilterChain也是一个chain,每个chain中有多个filter。每个SecurityFilterChain都会对应处理一个http请求(或者一个pattern,如/foo/**)。
4.2.2 WebSecurityConfigurerAdapter
@EnableWebSecurity注解以及WebSecurityConfigurerAdapter一起配合提供基于web的security,实现以下功能:
- 要求用户在进入你的应用的任何URL之前都进行验证
- 创建一个用户名是“user”,密码是“password”,角色是“ROLE_USER”的用户
- 启用HTTP Basic和基于表单的验证
- Spring Security将会自动生成一个登陆页面和登出成功页面
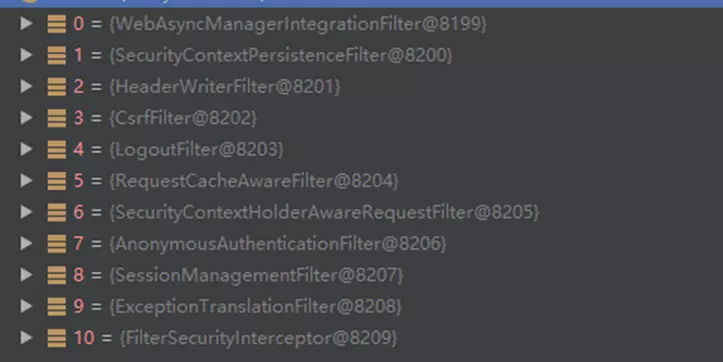
Springboot引入Spring-Security相关包时,会默认创建一个WebSecurityConfigurerAdapter,拦截所有的http请求(/**),且Order值为SecurityProperties.BASIC_AUTH_ORDER(可以通过为WebSecurityConfigurerAdapter设置Order,Order越低,优先级越高),并创建一些filter。
-
WebSecurityConfigurerAdapter与ResourceServerConfigurerAdapter哪个生效?
WebSecurityConfigurerAdapter与ResourceServerConfigurerAdapter同时在的话且都配置了处理url为:
/api/**,默认是后者会生效。因为继承ResourceServerConfigurerAdapter的类往往使用@EnableResourceServer,其中一个作用是Order设置为3,而继承WebSecurityConfigurerAdapter的类默认Order为100。继承ResourceServerConfigurerAdapter的类优先级更高。我们每声明一个
*Adapter类,都会产生一个filterChain。前面我们讲到一个request(匹配url)只能被一个filterChain处理,这就解释了为什么二者Adapter同时在的时候,前者默认为什么会失效的原因。
欢迎关注我的微信公众号
互联网矿工
